
A friend of mine mentioned on her blog that she had just taken several photos of her art quilts but there was something off about them, she was going to have to shoot them again.
I actually screamed "Wait!" at my laptop. (I don't think she heard me.) I left a comment saying that minor (and sometimes major) keystoning and distortion can be corrected in photoshop really easily.
I'll be giving her a lesson soon but thought maybe you all would like to see this too. Some of you may already know it but if you don't, it can be the difference between sanity and drooling in the corner when you've got a lot of photos to take.
I use Photoshop Elements 8. Now before you go saying that's a super expensive program you can't afford, I'm here to say not true. Its $80. Works on PC and Mac. Its essentially the little brother version to the full blown suite but it performs well for everything I need to do. So that's what I'll be showing.
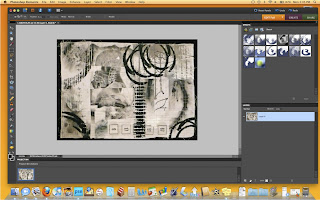
First you need a really crappy photo. I was a bit horrified to find this one in my library when I went looking:

I haven't a clue why I shot this at such a weird angle. I ended up re-shooting this because I couldn't correct the lighting to my satisfaction but we're going to pretend for the sake of this exercise that the lighting is text book perfect (work with me here). We're going to focus on making it look like this:

(I left all of the screen shots of working in the program pretty big so click on them to make them blow up.)
So here's what you do if your picture just flat out sucks and you (a) don't have time to re-shoot it or (b) are feeling bitter and refuse to let it rule your life by taking another picture of it (what? you've never felt that way?)
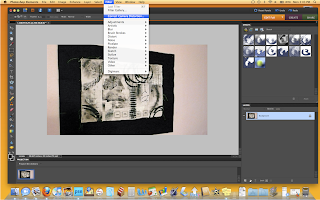
Step 1: Open your crappy picture up in Photoshop

*****************************************************
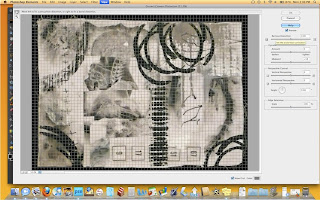
Step 2: Click on the "Filter" pull-down menu and select "Correct Camera Distortion" (this command is your best friend)
Step 3: You'll see a new window with a grid across your image and commands on the right hand side.
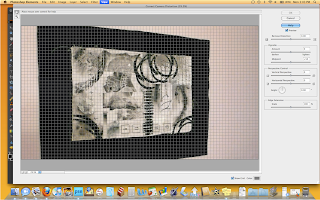
Step 4: Here is where you can correct keystoning on your picture. The middle section is labeled "Perspective Control." Our photo obviously has huge issues on the horizontal perspective so we're going to use the slider labeled "Horizontal Perspective."
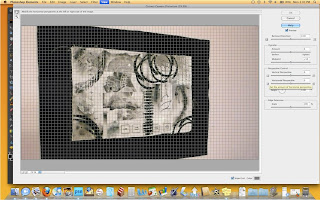
Step 5: Simply move the slider to the right or left and watch as your photo flattens out. The grids over the image will help you know when to quit.
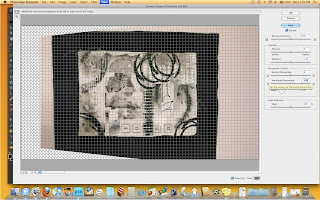
Step 6: Click OK when you are happy with how it looks and it will take you back to the main workspace window. Notice the checkerboard pattern on the left hand side. This shows that the image has been tilted. (Told you it was a lousy photo.) I tend to leave a decent amount of room around my images when I shoot them so that if I need to correct any keystoning, there is enough border for me to do so. Sometimes it gets a little difficult if you have cropped it in real close.

Step 7: If you're still not happy with how it looks, go back and mess with the horizontal and vertical perspective sliders some more. When you're done, crop it and no one will ever be the wiser.
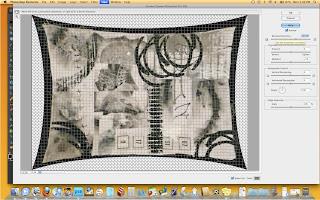
Step 8: You can also correct distortion on the image. This time when we say distortion we are referring to an image that looks like its falling in on itself (concave) or bulging (convex). If you go back to the "Correct Camera Distortion" under the "Filter" pull down, you'll notice a slider bar at the very top labeled "Remove Distortion."
Step 9: Our photo doesn't have any distortion of this kind to correct but look what happens if we move the slider to the right - the image becomes concave:
Step 10: And if we move the image to the left, it becomes convex:
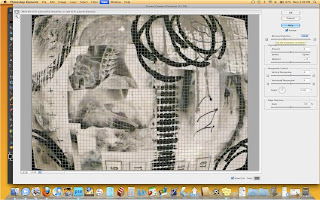
So if your image has some weird bulginess happening, you can fix that up with "Remove Distortion" and make it look less like something from a Tim Burton movie set.
I try to be pretty careful taking my photos but let's face it, its not possible to make them perfect every single time. Its comforting to know that Photoshop has me covered and that I can tweak things and make them look better.
Now you know too. Happy photos for everyone!

*****************************************************
Step 3: You'll see a new window with a grid across your image and commands on the right hand side.

*****************************************************
Step 4: Here is where you can correct keystoning on your picture. The middle section is labeled "Perspective Control." Our photo obviously has huge issues on the horizontal perspective so we're going to use the slider labeled "Horizontal Perspective."

*****************************************************
Step 5: Simply move the slider to the right or left and watch as your photo flattens out. The grids over the image will help you know when to quit.

*****************************************************
Step 6: Click OK when you are happy with how it looks and it will take you back to the main workspace window. Notice the checkerboard pattern on the left hand side. This shows that the image has been tilted. (Told you it was a lousy photo.) I tend to leave a decent amount of room around my images when I shoot them so that if I need to correct any keystoning, there is enough border for me to do so. Sometimes it gets a little difficult if you have cropped it in real close.

*****************************************************
Step 7: If you're still not happy with how it looks, go back and mess with the horizontal and vertical perspective sliders some more. When you're done, crop it and no one will ever be the wiser.

*****************************************************
Step 8: You can also correct distortion on the image. This time when we say distortion we are referring to an image that looks like its falling in on itself (concave) or bulging (convex). If you go back to the "Correct Camera Distortion" under the "Filter" pull down, you'll notice a slider bar at the very top labeled "Remove Distortion."

*****************************************************
Step 9: Our photo doesn't have any distortion of this kind to correct but look what happens if we move the slider to the right - the image becomes concave:

*****************************************************
Step 10: And if we move the image to the left, it becomes convex:

So if your image has some weird bulginess happening, you can fix that up with "Remove Distortion" and make it look less like something from a Tim Burton movie set.
I try to be pretty careful taking my photos but let's face it, its not possible to make them perfect every single time. Its comforting to know that Photoshop has me covered and that I can tweak things and make them look better.
Now you know too. Happy photos for everyone!
9 comments:
Awesome! I've not used that feature before!
Thanks for the advice. I'm just starting to play with elements and it is so much fun!
Great tip! Thanks for sharing.
Thank you for making it look so easy. I don't think I would have looked how to make that change, I would have struggled just to know what they called it.
This post has just saved my sanity and possibly my life (frustration and stress can be fatal). Thank you Lynn! You have just been elevated to Goddessness :o)
Fantastic tut, girlie, thanks for writing it!
Thanks for the photo tutorial. It'll be very useful.
That is awsome. Now I know I need Photoshop.
This is awesome! Thank you so much!
Post a Comment