the art of gift wrapping part 1: Screen Print Your Own Ribbon!
the art of gift wrapping part 2: Fabric as Gift Wrapping
the art of gift wrapping part 3: Screen Printing Your Own Paper
the art of gift wrapping part 4: Sprucing up Brown Kraft Paper
Part 5 of our art of gift wrapping craft tutorial series takes a look at Easy Decorations for Gift Bags.
I love gift bags. You can cram any kind of odd shaped gift into them and its neatly "wrapped" without giving away what it is.
My mom's birthday is coming up soon. If you have a birthday around the holidays, then you know that sometimes its hard to separate the two celebrations. I think birthdays are special so I like to make sure it stands out.
She loves pink and lace and all things girly so I made sure to indulge her likes in making this:
 front and back view of stuffed heart
* * * * * * * * * * * * * * * *
Step 1
I used a brown kraft bag for this. You can use any paper bag you like but steer clear of the ones that have a shiny surface, the paint doesn't stick real well to those.
I chose the daisy doodles screen and the cosmopolitan pink paint from the shop:

We talked a little bit about using Simply Screen on paper in Part 4 of the series. The textile medium in it can sometimes leave a tacky feel when you use it on paper. I decided to give it a shot here since I wanted the metallic pink color.
It did stay a little bit tacky but it was minimal, not enough to make me want to ditch it altogether. So I chose the color over a perfect print for this project. Whether or not you can live with it is up to you, there are many other paint options for printing on paper.
* * * * * * * * * * * * * * * *
Step 2
Gift bags are not nice and flat like fabric or a sheet of paper. They have some bulk to them that can cause them to spring back when you are trying to print on them. This can cause your print to come out blurry - boo!
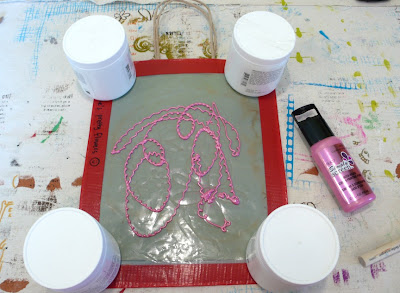
But there's a real easy solution. Put the screen on your bag where you want to print it and then weight the corners of it down so there is less spring in the bag:

Go ahead and print your image:


Set your bag aside to dry while we make the tag for it.
* * * * * * * * * * * * * * * *
Step 3
One of the things I like best about gift bags is that you can hang things from the handles. I like lots of danglies on bags. :)
I decided to make a unique tag for the bag (since its for my mom and all) - a little plushie heart.
Back before Halloween I did a tutorial on making a screen printed plushie skeleton. I used the same process for making the heart here. I'll touch on some of the steps for this tutorial but if you want to see every step in detail, be sure to go and check out that post.
I started making my plushie heart by using the nested heart screen and printing it on some osnaburg fabric:

I printed up a whole bunch while I was at it so I can make some little plushie ornaments for the Christmas tree. The process for that would be the same, just don't tie it onto a bag. :)
* * * * * * * * * * * * * * * *
Step 4
Put right sides together and give your heart a little sew on the machine:

I like to sew around completely and then cut a slit in the back for turning and stuffing. (I show all this in the skeleton plushie tutorial.) But you can leave an opening in the edge if you prefer and turn / stuff it that way.
I stuffed the little cutie lightly, I wanted it to hang nice. I thought that if I stuffed it a lot then it would sticking off the side of the bag like a wild thing trying to flee so I went for slightly understuffed this time.
I also cut a rectangle from the same piece of fabric I printed the heart on. I used perle 5 embroidery thread for stitching on the label and making the hanger. Since we are doing a few things with the thread, make sure its a fairly long piece.
Here we are with the heart turned and stuffed and ready for me to stitch the slit on the back shut:


If you do this step, don't cut the thread once you are done with this part.
* * * * * * * * * * * * * * * *
Step 5
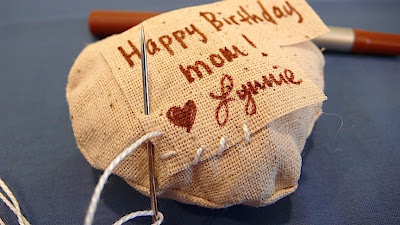
Since I need a label to cover up the slit in the back that I stitched shut, I decided it would be a good opportunity to personalize the heart for the occasion. (You can do a label even if you don't need one. If you plan to leave an opening for turning/stuffing along the seam, you could even write your message before sewing.)
I like Identipen markers, they work great on fabric and are permanent:

I gave my label a little trim to make it fit on the heart nicer:

Since we didn't cut the embroidery thread after stitching the slit hole in the last step, we can just continue on with it for attaching the label. Whip stitch around the edges to attach it. I started stitching at the bottom, middle edge of the label. This will come in handy in a moment. Stitch all the way around it:

* * * * * * * * * * * * * * * *
Step 6
When you are done stitching down your label, don't cut your thread!

Squish the heart a little bit so you can run the needle up underneath the label and out the top of the heart:


* * * * * * * * * * * * * * * *
Step 7
Take the thread out of the needle and tie a couple of knots to hold it in place:

* * * * * * * * * * * * * * * *
Step 8
Tie your stuffed heart onto the bag:

CUTE! :)
* * * * * * * * * * * * * * * *
Step 9
I think the bag looks pretty darn adorable with the screen printing and heart but knowing my mom and how much she loves lace, I took it one step farther and decided to add some on.
I cut a strip of lace and put a few dabs of tacky glue on the back:

And laid it across the bag to dry:

And there you have it!

A very girly gift bag full of personal touches!
I had a lot of fun writing these tutorials - hope you enjoyed them too. :)
I've got tons of other projects in the works right now so the blog will be going back to a mixture of tutorials and regular posts.
Happy Printing!

3 comments:
These tutorials are fantastic!
Well, this makes it official...you are the Queen of gift wrapping.
I love all your creative ribbons and wraps!
Post a Comment