
Part 4 of our art of gift wrapping craft tutorial series focuses on using humble brown kraft paper.
Brown kraft paper is one of the ultimate budget saving ways to go when it comes to wrapping. I picked up a roll of it at the dollar store. I really like the natural look of it but let's be honest, it does need some sprucing up.
There are a couple of ways you can go about it. One way is to use Part 3 of our series and do some screen printing on it. Or you can do what I do - leave it as is and dress it up with some creative ribbon making!

If you missed Part 1 of the series where we screen printed our own fabric ribbon, go on back and take a look through it. We'll be using some of that ribbon here to give our package a fun look! :)
* * * * * * * * * * * * * * * *
Step 1
Wrap your box in brown kraft paper and choose a screen printed ribbon to go with it. I choose a ribbon that I made from osnaburg fabric (a very natural looking fabric found near the muslin in the fabric store) and printed with the nested heart screen.
I wrapped the ribbon around the package length wise so that I could get more repeats of the heart to show up:

We talked about different ways to secure the ribbon in Part 2 of the series when we wrapped our package in fabric but here's a recap:
1. You can stitch the ends together like this:

OR
2. Run a line of fabric glue along the edge (just a bit) and let it dry.
* * * * * * * * * * * * * * * *
Step 2
Since we are pretty much focusing on using ribbon to make our package look unique, we'll need to decide what we want to do next. Here are some ideas:
1. Use the same ribbon with the hearts on it, nothing wrong with this option! It is very cute after all! :)
2. Use a different color ribbon, one that isn't printed so add a strong punch of color.
3. Create a specialty ribbon that contrasts with the fabric one we've already added.
I went with choice #3. I decided I wanted a little bit of variety added into the mix so I dug around through my stash and pulled out some white and brown paper string and some red and white buttons:

If you don't have string like I used, embroidery thread or leftover yarn from your yarny projects are a great option too! Just look around the house to see what you have, if you're a crafter the odds are you've got plenty to work from - I know I do! :)
* * * * * * * * * * * * * * * *
Step 3
I liked using string that was the same color as the kraft paper but I wanted to make sure it stood out. So that's why I decided to add some white string in with it too.
Wrap the string around your package and leave long tails so you can easily tie your buttons on (we'll show that in a moment).
I cut three brown and three white so I'd have string flying about everywhere, might as well make it a party! Tie your string in place with two knots:

* * * * * * * * * * * * * * * *
Step 4
I chose buttons with two holes in it to make things easier for this step. If you have four hole buttons, you can still use those, just tie them to the string through only two holes.
Begin by tying a knot in one brown and one white string held together:

This will determine how far down the string the button will sit, its a stopper. So if you want your button to sit closer the center of the package, tie the knot near the center. Its all a personal preference.
I wanted a floppy, wilder look so I tied mine more toward the end of the string.
* * * * * * * * * * * * * * * *
Step 5
Slide your button onto the string. Feed the brown string through one hole and the white string through another:
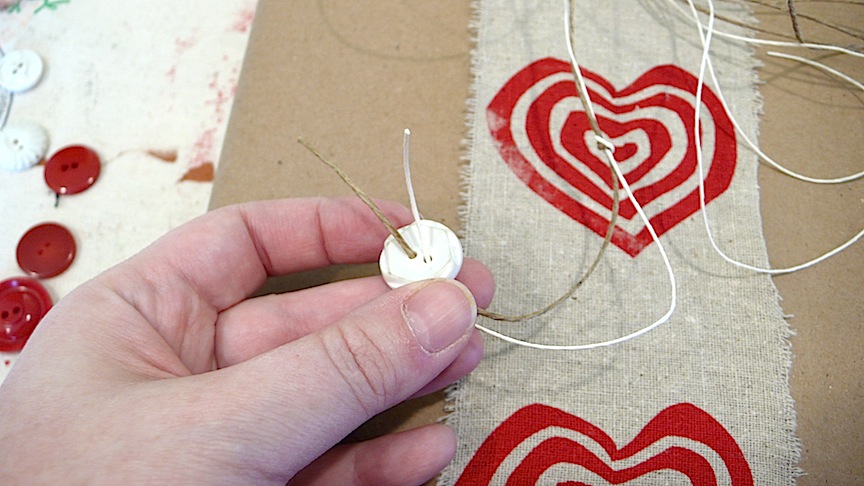
If you are using embroidery thread or yarn instead of string, you may want to thread it onto a needle first just to make this step easier.
* * * * * * * * * * * * * * * *
Step 6
Tie a simple overhand knot to keep the button in place. (I tied mine twice just to make sure the little buggers stayed on):

* * * * * * * * * * * * * * * *
Step 7
Repeat Step 6 until you've tied on all the buttons:

Pretty cute, huh? :)
One of the reasons I really like this package is because it says, "I'm handmade and proud of it!" Its easy, hardly takes any time at all and really stands out from the usual commercial packaging.
That wraps up (no pun intended!) Part 4 of the series. We'll finish up the series on Sunday with Part 5: Easy Decorations for Gift Bags.
I've had such a fun time putting this all together - I hope you are enjoying it too!
If you've missed any part of the series, here are some quick links back to the first three parts of it:
the art of gift wrapping part 1: Screen Print Your Own Ribbon!
the art of gift wrapping part 2: Fabric as Gift Wrapping
the art of gift wrapping part 3: Screen Printing Your Own Paper
And if you're looking for screens and paint to create your own wrapping, you can find everything you need in my etsy shop and instructional videos on my YouTube channel. I've got you covered! :)
1 comment:
So unique! Love how you've done this and incorporated screenprinting.
Post a Comment