14 March 2011

shop talk

I thought today I'd give a little update on what's buzzin' over at the shop.

Its been busy and hopping and a whole lot of screens have been whizzing their way off to new homes - warms my heart to think of all that screen printing gong on! :)

A few new products have been added lately and I'd like to give them a wee shout out here.

The lovely and talented Jackie Lams has five new designs in the shop:

Top row: Blueprint and Kimono Chain
Middle row: Scissors & Thread and Sweet Bird
Bottom: Stitches


* * * * *

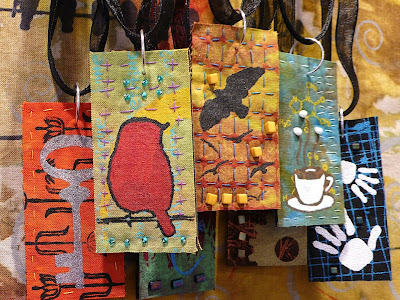
Many requests were made for screens of the images that I used to print the screen printed pendants in In Stitches so they've now got their own category in the shop. They are small but they are mighty! And great for more then pendants. Their teensy size endears them to all projects where you just want a little touch of something.


* * * * *

And last but not least, I've decided to start carrying some books in the shop. There are an incredible amount of resources for the surface design artist out there so it was hard to choose. I'd like to expand the category eventually but to begin, I've chosen two books from Claire Benn and Leslie Morgan of Committed to Cloth in the UK, Thermofax Printing and the one that they wrote with Jane Dunnewold, Finding Your Own Visual Language.


I have both and love them. I plan to only carry books that I personally have and enjoy (which is a pretty big category) so this seemed like a grand place to begin.

So that's what I've got - hope you find some goodies there that speak to you and want to take up residence in your studio! :)

13 March 2011

where i stand sunday


Its the mood colors produce that fascinate me most. Neutral calm or electric pulse, it creates the backdrop for every scene we paint in our lives. Even in the most mundane places, it creeps in and takes hold.


Where I Stand is an ongoing photo essay examining the different places I spend my life standing. Too often we take for granted the everyday places we spend our lives walking on. The ground we tread on has its own stories to tell.

11 March 2011

hands


I love hands.

So much begins with them. And ends.


They comfort, create, celebrate. Make art. Are the subject of art.

We reach out to each other from our earliest days to our oldest. They tell the world if we have found our soul mate, they bear the weight of our lives in the wrinkles and cracks - they carry the history of what we do.

You can see a person's history in their hands.

Mine are small. But in constant use, building up my life around me and pushing my art into reality.


Hands are beautiful.

09 March 2011

what do you see?

It was a long day today. Nothing bad, nothing out of the ordinary. Just seemed to stretch on for longer then it really was.

I came home and after pushing some things around in the mail pile, I wandered into my studio.

I flipped open my laptop and played this song:


I stood in front of my print table where I left a piece of white fabric the last time I was working in there. I planned to start a new project on Sunday and got interrupted and never got a chance to go back to it.

The music filled the room and I stared down that white piece of fabric. I didn't really have the energy to work on it but I studied it. The emptiness. The vast possibility that it had. Some people fear the blank slate.


I think its quite possibly the most exciting thing on the planet.

I wondered what passes through other artists' minds when they begin?

Do you feel excited? Empowered? Fearful? Tentative?

Or do you feel like you can conquer the world?

Even though I didn't work in the time I was in my studio tonight, I listened to that song and let myself fall into that unprinted fabric; knowing that this was my santctuary, the place where everything converged into perfect sense and harmony.

and the winner is!


The In Stitches eMag blog tour drew to a close yesterday so that means that today we get to find out who the winner is from my blog tour post.

So without further ado, the winner is -

Sandy of Fiber on Focus

Congrats Sandy! Email me your mailing address at FibraArtysta@earthlink.net and your prize (the red bird pendant above and a prize package of fiber goodness from Quilting Arts) will be in the mail to you!

Thanks to everyone who left a comment - all the fiber love is extremely awesome! :)

08 March 2011

cleaning out the cobwebs

I know that technically the new year begins on January 1 but I've always felt like this time of year is the really the true beginning.

I've never really found winter depressing. Annoying? Certainly. I hate commuting in freezing rain and snow and feeling my face freeze when I walk into work in the morning but I've never been a summer girl so I don't mind the dim days and lack of color.

But at the same time, it does feel like it goes on for far longer then it needs to.

And when its finally winding down, it feels like its time to freshen everything up - physically and mentally.

It feels easier to make my yearly goals now then it does at the beginning of January when I'm still weary from the holiday craziness. I'm beginning to adjust them, shove them around, show them who is boss. :)

The studio is getting a slight re-arrange and the spare bedroom finally got fixed. And I'm turning my attention to tidying my website up. It dramatically out of date and I find myself going through the angst (again) of trying to figure out what to do with it.

There's a certain kind of energy creeping into the air. Even though I'm sure Michigan is no where near done with snow, you can start to feel spring in the way the air feels and the sun is sitting at just the right angle in the sky.

It makes me want to give everything a little shine. Cleaned up house, cleaned up goals, cleaned up outlook.

Sounds good all around. :)

06 March 2011

where i stand sunday


Its a perfect study of neutrals, mirrored by a dove gray sky, a worn weariness with the winter season. In a place where most people wouldn't look for color, there it is - all shades, tints, values, hues. The beauty of the subtly of its richness is a sharp breath of unexpected - a reminder that there is depth even when we can't see it at first glance.


Where I Stand is an ongoing photo essay examining the different places I spend my life standing. Too often we take for granted the everyday places we spend our lives walking on. The ground we tread on has its own stories to tell.

05 March 2011

the need to unplug

My day job has me working in front of a computer for at least eight hours a day. I have an online business. I love it. I also love my email (which explains the withdrawal I feel when I go "long" periods of time without checking it - *hint* the periods of time aren't so long), I love my blog, I love seeing what people are up to on facebook.

I love being connected.

But I've learned that my poor brain can only absorb so much. Combine that with the fact that I love to be b-u-s-y (seriously, its some super obnoxious drive in me that rarely leaves me sitting still and the times I sit still are spent planning what I will do once I begin to move again) and I used to find myself feeling like I was being sucked down the rabbit hole on a fairly regular basis.

These two things have led to the development of three habits that help keep things in balance and I thought maybe we'd have a little chat about it today in case some of us are still struggling in these areas. I'm not saying I don't get overwhelmed, I'm not saying you will zoom around the house in your superhero cape if you decide to use some of these habits but they might help take the edge off if you're feeling like you just want to go drool in a corner and ignore the world.

So here goes:

(1) USING MY SUPERPOWER. I've talked about my superpower here before: The List. I structure much of my activities around The List. Obsessive? Perhaps. OCD? A touch.

But The List gives me focus so I can keep working toward my goals (that tend to multiply like dust bunnies). And it gives me something really great: peace of mind.

My brain gets a break, it doesn't have to remember everything. The List has it covered. All the brain has to do is remember to look at the list (and not loose it).


(2) THE ONE HOUR RULE. At least one hour prior to bed, the laptop goes off.

Shut down.

Put aside.

During that hour, I give myself permission to forget everything. The day is done. I've got The List. I can pick up where I left off the next day.

I read. I watch TV. I antagonize Dooley:


Anything but online. It slows my mind, it lets it get still and quiet for a bit and actually makes sleep better.


(3) SAYING NO. I admit that I'm still working on this one.

Its not an easy thing to let some things slip through your fingers. But consider the alternative: banging your head against the wall as you beg the universe to either add ten hours to the day or allow you to exist on one hour of sleep a day. (Or ideally both).

Like I said before, I love to be busy. Makes me all giddy. Its my drug. But I reach a point where I crash. And its no good because when my body decides for me that I need to slow down, it just makes things more tense and difficult and just...blah.

Its about balance, right?

So stepping back when an opportunity presents itself and giving it a good consider helps keep things more manageable. The biggest question is this: do you want to do it? Then ask yourself if you'll enjoy it and finally, do you have the time to do a good job?

I find I can normally squeeze things into my schedule. But I can't always fit them in and do a good job. So even if the first two questions are a positive (yes, I want to do this and yes, I'll enjoy doing it), if the last one is a big fat no, it gets skipped.


As is life's tendency, it doesn't always work that I can employ these habits. There are times The List gets set aside for more pressing matters or there are some days when I need down time more then I need to work. But I've found I keep on track better with these for one major reason: I'm taking care of myself - which is just as important as everything else.

So go pet the dog (or kitty) or go read your book or pick up that knitting and do a few rounds without guilt. The schedule and to-do list will be waiting the next day.

Unplug! :)

04 March 2011

{untitled}


{untitled} is a blog post series featuring photos only that I find inspirational - I hope you do too...

01 March 2011

in stitches eMag BLOG TOUR! :)


A couple posts back I talked about the article I have in the new eMag from the folks at Quilting Arts - In Stitches.

I've got an article in it detailing how to make thermofax screen printed pendants like these.

I admit it - I geeked out over it pretty hard. Its incredibly nifty in every way. I've got bookcases full of magazines but this one? This one I can interact with.

Sort of makes me feel like a kid with a brand new box of crayons.

And just when you thought the team at Quilting Arts couldn't get more creative or generous, they have decided to do a blog tour (complete with prizes so keep reading) with all the artists who have an article in this edition (this is the second edition - remember, PC people go here, Mac people go here).

Its brilliant because I don't know about you but I love getting to know the artists I read about and learn from - makes their work more intense for me.

And if that isn't enough, how would you all like a little giveaway? Well - you've got it!!!

Quilting Arts is donating a special prize package full of fiber goodness and your's truly is including this screen printed pendant (the ribbon necklace is included):


All you have to do is leave a comment on this blog post (anything will do but would love to hear what your favorite article in Quilting Arts or Cloth Paper Scissors ever was or what you most love about being a fiber artist if you would like to share) and you'll be in the running!

You have until Tuesday March 8 so get commenting. A winner will be randomly chosen and announced on Wednesday March 9.

And don't forget to snag your very own copy of the eMag! :)

Next on the blog tour is Jackie Cardy - check her out! :)


If you'd like to visit all other blogs on the tour (and who doesn't???), here is the full schedule:

Sunday February 27 - Pokey's blog

Monday February 28 - Jane Davila

Tuesday March 1 - right here! :)

Wednesday March 2 - Jackie Cardy

Thursday March 3 - Deb Bates

Friday March 4 - Deborah Boschert

Saturday March 5 - Michelle Allen

Sunday March 6 - Liz Kettle

Monday March 7 - Lyric Kinard

Tuesday March 8 (tour wrap up) - special surprise guest on Lindsey Murray's blog

28 February 2011

art & fear - chapter 1 read-along

Here we are - the first of the month and the beginning of the new series I mentioned on Feb 1 where we discuss the book Art & Fear.

Several of you have said you're joining me in reading the book - how exciting! I expect that you won't agree with everything that I'll say. And I don't expect you to. That is usually what happens during a discussion like this.

I would love to hear your opinions in either comments on the posts or on your own blogs. If you post about it on your own blog, be sure to leave a link in the comments so every can find you.

So let's get to it:

This post takes a look at Chapter 1: The Nature of the Problem.

There are three major ideas that this chapter touches on that I found interesting so I'm going to discuss those.


***Calling or hobby?***

In the very first couple of pages, the authors discuss what I think is one of the biggest challenges we face as artists today - having our work seen as work. Not as a hobby, not as a quaint way to pass the time - but as serious work. Like any other job.

Its possible that in the past, artist was a more respected title. I don't know about you but often when I tell people I'm an artist, its quickly followed by the question, "But what do you do for a living?"

Now I do have a day job but my end goal is to eventually be a full time artist and make my living that way. I expect it will take many more years to get to that point and I'm content to work toward that goal but I often wonder what makes people think that all I have to do is step through the doors of my studio and artwork instantly starts falling into place?

The fact is that making art is hard work. It involves many steps and constantly learning new skills. Which brings us into the second major point of this chapter:

***Does being an artist mean that you possess some kind of magical gift?
***

The authors say no. And I have to say that I agree. I've found that the people who make the most art are the ones that are stubborn to the core and refuse to give up until they've mastered their skills and found that sweet spot that makes them realize they are making the art they are meant to.

I'm not saying talent isn't important. Hardly. But just because you are talented doesn't make you an instant success. On more then one occasion I've heard the comment from someone who has just taken a class, "She/He is a great artist but he has no idea how to teach."

Talent is talent. But skill can be learned. Everything we do in this life is learned, down to the tiniest detail. The only thing that stops us from plowing ahead and making things go is doubt in ourselves or worry about what others will think.

I've been there. When I made the conscious decision to move my art beyond the walls of my studio, it was a gut wrenching one. Let's face it, some people are just plain crabby about art. They can always do it better and they know way more then you do. They're quick to offer advice and know just what you did wrong. They'll stand there and look at your work and give you their expertise all day long.

But the thing that I've learned from these people is this: my work is hanging out in the open for people to see - where is theirs?

Crabby people are not the end all be all judges of your work. There are underlying tones to their comments. Could be insecurity on their part, could be jealousy - whatever it is, its not your problem. You make art. They make criticisms. Which one would you rather be doing?


***Failure is not failure***

The authors talk about the fear of failing and the isolation of making art in this chapter as well. I think that's a major one.

Its much easier to not try then it is to try and be rejected or fall flat on your face. No one likes feeling like a failure. I know I don't.

But I also know that even the failures have great value. The work that I choose to share on my blog and my website are the ones that worked. You don't see the half finished ones that are sitting in a box under my work table. The ones that I looked at and thought, "What in the hell was I thinking?"

If nothing else, I figured out how not to do something. This quote from Scott Adams sums up how I feel about what many people think are failed pieces:

Creativity is allowing yourself to make mistakes.
Art is knowing which ones to keep.


Its likely that most of us make art for ourselves. We make it for a small circle of people and won't see our pieces hanging in the Louvre any time soon.

And that's okay. I found long ago that removing the pressure of perfection from what I create instantly added back in the joy that that stress was beginning to strip away.

We are ordinary people. We will go through our lives making art to please ourselves and if we are lucky, a couple other people too.

But remember that being an artist is sacred to yourself. Honor yourself first and the work will reflect that.


On April 1, we'll talk about Chapter 2 of Art & Fear.

27 February 2011

where i stand sunday


Its the early morning hours, just after I roll out of bed, is when I feel most connected to the world, myself, my life. Before a single TV or computer or radio is switched on, I soak in the silence and let my mind rest before the marathon of the day.


Where I Stand is an ongoing photo essay examining the different places I spend my life standing. Too often we take for granted the everyday places we spend our lives walking on. The ground we tread on has its own stories to tell.

26 February 2011

acknowledging the sacred

Last week I returned to the work force full time.

I'd be lying if I said I didn't miss my studio.

But I spent the week planning what I wanted to do in there today and when I walked in, I realized something:

My studio space is sacred.

Might sound corny and overblown but think about it...its such a personal space. A place where no one complains if we hang up something on the wall that only we like or the place where we can leave out the unfinished projects and piles of fabric.

We can even step all over them if the mood strikes.

I realized something today as I sat there in the stillness and just looked around. I'm totally lucky in every way that I have a whole separate room to work in and keep things (other members of the household feel the same since it minimizes how much gets trailed around the rest of the house.) But its more then just a room.

Its a state of mind.


I carry it with me no matter where I am.

My studio is the small journal I keep in my bag, the meditation music I have on my ipod, the daydream that passes through my mind in the middle of the day.

Its the place where the sacred belongs. I'd never really given it a name before but there's really no other way to describe it.

Do you feel it? I know you do. Its part of why we create, I think. This sacredness. This absolute separateness from the rest of our lives that can't be touched by anything but creativity.

Bliss.

24 February 2011

{untitled}


{untitled} is a blog post series featuring photos only that I find inspirational - I hope you do too...

22 February 2011

In Stitches eMag - thermofax screen printed pendants! :)


One of the most exciting things about Quilting Arts is that they are constantly coming up with new and exciting things.

And that point is driven home by one of their newest items - In Stitches eMag. They just issued their second edition of it and I'm super proud to say that your's truly got the chance to be a part of it.

(Its all part of my evil plan you see, thermofax screen printing addicts e-v-e-r-y-w-h-e-r-e...)

I got crafty this time and decided I wanted to make something I could wear. I came up with these little fellows:


Those are thermofax screen printed pendants. Want a closer look? Here:


Want to know how to make them? Full directions are in the eMag. And they have two different versions, one for PC and one for Mac.


Curious how this all works? Here's a clip of Pokey talking about how it all works:


If you move your mouse over the pendants in the article, they swing around. Its super cute, I may have squealed when I saw it. ;-)

There's sooooo much other good things in there. Its awesome in every way possible so be sure to check it out!

(And the screens that I used to print the pendants will make an appearance in the shop soon. The next couple of weeks. They are super tiny little fellows and I just need to get them up there so you can print away.)

taking a breath

Yesterday I took a deep breath, gathered all the fortitude I could find and did it: I unpacked everything from the Quilting Arts TV & DVD taping.

Oddly enough, it was not as horrifying as I anticipated it to be. I figured it would be a long marathon of organizing and putting away. When I was getting ready to go, I organized every taping segment into a separate taping bin. So each TV segment had a bin and then each of the five DVD chapters had their own containers as well.

It seemed obsessive at first but when I got to the studio, I was really glad I had done it.

However, I didn't take any kind of care when I packed everything up to go home. It wasn't necessary. I just tossed everything into whatever bin I could find, knowing that when I got home I'd have my work cut out for me.

It only took a couple of hours. And as I went through each bin, I took printed fabric that was created for examples and new artwork and methodically pinned them up or leaned them against my design board.

I admit I was pretty shocked when I stepped back and saw this:


A couple of things up there are not from the prep work but...wow. Just...wow.

That's a lot of stuff. For me, at least.

I don't know if you recall, but I talked about my approach to printing fabric briefly at the beginning of the year. I call it Intentional Printing.

My tapings meant that I needed fabric samples for the different techniques that I demo'ed. I admit, this sent a wee panic through me. I've developed the habit over the past couple of years of printing fabric as I need it, not printing just for the sake of printing.

Its not that I think this is the wrong approach. Its jut not what works for me. It became a way to control the outcome of everything from start to finish. But that also leaves me with a serious lack of printed stash.

Not so much anymore. Check out the surplus from the sample making:


When I was creating these pieces, I was sure that they would remain as samples. I like them but since they didn't begin with a particular work in mind, I figured they would be difficult to fit into whatever it was I wanted to make.

But I'm having second thoughts. Its kind of thrilling to have so much there waiting for me to pick from. I'm undecided. On the one hand, it will be nice to use these since I'm heading back into the work force this week. But at the same time, I don't want to be faced with this task if the need every comes up again.

I'll have to give it some thought. What do you think? Use it or save it as samples?

And those are not the only things that were prolific. There is also the finished work:


Holy cow.

I knew I was making a lot. I spent months prepping. (I find the one on the left that says "rest" humorous. I think my subconscious was trying to tell me something.) So I suppose it shouldn't be so surprising but pulling it all together into one pile is really something else...

I need to get these photographed. I think I might be hiring that out from now on, it will be nice to have these things to update my site with.

I've been taking a breath in many ways this week. February has been an exciting month...and its not done with me yet. Its an amazing thing really, since this is only the beginning of the year.

The thing that I've realized most is how exciting and fun and unpredictable life can be. I'm struggling a little bit keeping my mind in a peaceful positive place but I'm hoping that I can force it to stay there.

I can't wait to see what March has to bring...

21 February 2011

screen printed pillow cover project tutorial

One of the items that I pulled together for my residency with 3 Creative Studios this month is a screen printed pillow cover.

(photo by Jackie Lams)


You can snag it as a downloadable PDF from the front page of their website but I thought I would post the instructions here since I think its pretty groovy and I think you will too.

Its a rather long tutorial so I really recommend grabbing the PDF off of 3CS's site, its a handy reference rather then having to come back to the blog post.

So without further ado, here are the instructions on how to make yourself your very own screen printed pillow cover. :)

* * * * * * * * * * *

I admit that I have no limit to the amount of things that I will screen print. I can't help myself, its an obsession that I will find any excuse to indulge. I guess its not surprising that it has made it into my home decor.

I've long admired the stylish throw pillow covers sold in all the fancy home dec catalogs. I've not admired the prices, though. One of the gifts of being an artist is that we can make things for the faction of the cost that it runs in the retail shop.

I decided it was time to whip out the screens and make a pillow cover of my very own. I thought you might like to see how its done too because there is no way I'm stopping at one and I'd love some company for my obsession! :)

Here are the supplies you will need:


* fabric (I'm a cotton girl but use what you love)

* thermofax screens

* screen printing paint

* 14" square pillow

* 3/4" fusible Velcro

* 1.5" sponge brushes

* rotary cutter / mat / ruler

* sewing machine


The instructions for this tutorial are written for a 14" square pillow that I bought at Joann Fabrics. (40% off coupons rule.) But you can adapt it to any size pillow that you like.

And a quick word about fabric. You do NOT have to use hand dyed fabric. Its nice, its cool, its groovy. BUT if you aren't inclided toward making the mess or bearing the cost, screen printing plays very nicely with commercial fabric as well. I use both you can too. There's no rule to what you have to use, just make sure you like it.

Same with the screens/imagery I used. If you don't dig it, go your own way.

Now let's make a pillow cover!


STEP 1

Cut a 15" squrae of fabric for the front of your pillow. (I like a 0.5" seam allowance.)


* * * * * * * * * * *


STEP 2


We're going to print three layers of images for this pillow.

The first layer is scuff printed. I chose a screen with text on it. Scuff printing is the process of printing partial or ghost images. They are accomplished by using very little paint on your screen and only printing portions of the image rather then the whole thing.

Allow your print to dry, it doesn't take long. This is the background, so don't judge how it looks just yet.


Often when you start laying down the layers, the first one doesn't look that impressive. Just keep going. Its like cooking. Those onions and tomatoes aren't so exciting on their own but put them in chili and you really have something. Same philosophy goes for creating layered prints.


* * * * * * * * * * *


STEP 3

I like to get a clear sense of where the center is on the fabric. I place paper where the seam allowance will be and then place the screen in the center of that.


* * * * * * * * * * *


STEP 4

The next two layers of the printing are solid printing. (This is shown in Part 2 of my Basic Screen Printing video on YouTube.)

Solid printing means that we are printing a clear bold print of our image.


This time I didn't wait for the print to dry. I printed the final layer over top of the previous wet print. Because the other image was still wet, it will create a monoprint on itself on the back of the next screen. This creates shadow prints on other areas of the fabric when I lay the screen down to print. I like this but if that doesn't float your boat, wait for each layer to dry in between.


Now that we've printed three layers, we have a pretty good looking pillow top. Were going to allow this to dry completely.


* * * * * * * * * * *


STEP 5

While our print is drying, let's move on to making the back for the pillow cover. Its constructed of two pieces. Cut out one piece of fabric in the following sizes:

Backing piece #1: 15" wide x 10.5" high

Backing piece #2: 15" wide x 12.5" high

Along the longer side of the fabric (the 15" side), fold the seam up 1.5". Do this twice on each piece, using up 3" of the length of the fabric. (This is where the Velcro will be added later. I call this the Velcro seam.)


* * * * * * * * * * *

STEP 6

Take the Backing pieces to the sewing machine and stitch down both edges of the Velcro seam that you create din Step 5.


* * * * * * * * * * *


STEP 7

Give your printed panel a little pat to see if its dry. If it is, heat set it. This will make the paint permanent and washable. Simply iron the piece on the reverse side for a minute.


* * * * * * * * * * *


STEP 8

Now we are ready to assemble the pillow cover. Lay the pieces right sides together, overlapping the Velcro seams of the backing pieces as shown in the photo below:


Pin everything together and give it a whirl through the sewing machine, sewing a 0.5" seam allowance all the way around the perimeter of the pillow cover.


* * * * * * * * * * *


STEP 9

The next step is to add the Velcro to the Velcro seam. I'm a big fan of fusible Velcro, so easy to add to your projects. I have a little trick to make sure that everything lines up perfectly. Begin by putting the loop and mesh side together and cutting them into four small pieces, about 1" wide each.


* * * * * * * * * * *


STEP 10

Remove the sticker from ONE side of the Velcro and place the sticky side down along the edge of the Velcro seam.


* * * * * * * * * * *


STEP 11

Once all four pieces are placed, remove the sticker from the other side. Take care to hold the piece in place when you do this so you don't lift if off the fabric.

Lay the overlapping Velcro seam on top of the exposed sticky side of the Velcro pieces and press them with your hand so that they make contact with the fabric.


* * * * * * * * * * *


STEP 12


Iron the Velcro pieces for 90 seconds (directions from the package).


Give them a moment to cool and then you can pull the apart. Viola! Perfectly aligned Velcro closures!


* * * * * * * * * * *


STEP 13

Shove your pillow form into the pillow cover, giving it a good tug here and there so that the pillow sits proper


SIT BACK AND ADMIRE YOUR WORK! :)


20 February 2011

where i stand sunday


Four legged friends have always been present in my life, but always of the canine variety. The kitties regarded me with a certain amount of skepticism, as if they knew my tendencies toward their natural opposites. I stood mesmerized by their eyes, a lesson in contrast and color.


Where I Stand is an ongoing photo essay examining the different places I spend my life standing. Too often we take for granted the everyday places we spend our lives walking on. The ground we tread on has its own stories to tell.