07 July 2013
Reclaim Your Space - Containers & Labels
* This is the fourth post in a six part series about how I reclaimed my studio spaces.
* See the third post "Reclaim Your Space - Hyperfocus".
* See the second post, "Reclaim Your Space - Enlisting Help".
* See the first post, "Reclaim Your Space - Your Mindset".
Let's talk storage containers, shall we? (One of my favorite topics, love them almost as much as I love post-it-notes.)
**A couple people asked me how I decided what size and quantity of bins to buy.
In terms of the size, I chose a 17 quart because I knew it would stay reasonable in terms of weight. Super huge bins are out for me, hate them. Can't move 'em, take up too much space, and they are just another black hole. Small and portable is what I need. I also didn't want anything with holes in it, solid sides.
I bought twenty because it was the cheapest way - to buy in bulk (and I had a lot of stuff to tame). The ones I got are from the Container Store and are called "Our Sweater Box". Also love that they are made in the U.S.A. :)
When the purge began I had all shapes, sizes and colors of baskets and bins. I would take things and put them in the baskets and feel as if I had organized them. Clearly it wasn't working. And those were just the open baskets and bins.
I also had larger containers with lids on them full of stuff. I did some more thinking prior to buying the containers I did about why the containers/bins I had weren't working and realized two very important things:
1. If the items I have are not out in the open or in a see through container, then I don't remember I have it and will end up re-purchasing the exact same items. The phrase "Out of sight, out of mind" could have been written about me.
2. If the box has a lid on it, I consider whatever is in it archived and I'm not likely to go into the box because I've decided the stuff is "old", "not needed" or "off limits." (No idea what that's about but that's how I think about it.)
Knowing these two things really helped because I was able to get rid of all the containers that weren't see through (except for the drawers in the IKEA organizers but there is a solution for that too). And I was careful about what I put a lid on. But really, those two catching points for me pose a big question - how do you create a space that is aesthetically organized when everything needs to be visible?
Here's one way:
Use the container, put the lid beneath it so the lid itself doesn't turn into clutter (had that problem too) and set it on a shelf. (Please note that if you are ever in need of a safety pin, I own 1,342,097 of them. I'm willing to share.)
I also realized that labels are a good thing. I resisted them for a very long time because I felt like I was pigeon holing a space and I immediately felt tied down.
Well, yeah. That's the point.
As Mary the Wonder Organizer said, I've just freed up brain space because I don't have to try to remember where everything is. Things have a home, it gets put there, end of story.
I got a little bit label happy:
Clear, concise and being able to see everything (either via label or clear container) takes away the possibility that I will be buying duplicates.
I have a lot of projects and samples from all the articles and classes I teach. Those went into boxes with lids. I'm happy to tuck those away out of sight. I want to hold on to them for the time being but I don't want them taking up real estate.
The key lesson learned: Simply owning containers and baskets and organizers does not make you organized. They must function the way you need them to, no matter how cute they are. :)
In the next post, I'll talk about how to get rid of the stuff you don't want to keep.
06 July 2013
Reclaim Your Space - Hyperfocus
* This is the third post in a six part series about how I reclaimed my studio spaces.
* See the second post, "Reclaim Your Space - Enlisting Help".
* See the first post, "Reclaim Your Space - Your Mindset".
Where in the world does one begin when facing this?
The Warehouse Before the Purge
Here is the game I would play with myself: I'd sit in the living room thinking about how great it would be to have the Warehouse (the nickname I give to the second of my studio rooms that is used for storage of various items and completed projects) and how it's not such a big deal. I could clean it up, no problem.
Then I'd walk up the stairs, open the door, look at the mess and flee.
I still find it curious that I was not able to concentrate on working on a small portion of the mess at a time. I mean, as an Artist, I'm obsessed with details. I can hone in on a two inch square and pack two tons of details into it. But ask me to pick one small pile from the giant heap to sort out and my skin would begin to crawl.
This was the first room to be tackled and I will be completely honest, I was skeptical about it getting done. But I decided on very clear parameters before Mary the Wonder Organizer even arrived with her good counsel: I would not spread the mess all over the rest of the house in order to clear the room (it fit in there or it went away), I would not get rid of everything simply to make space and then have to repurchase it later, and there would be nothing sitting on the floor in the middle of the room.
The purge was about getting rid of the things I absolutely did not need anymore and gathering all the stuff I would use into a cohesive manner so that I would stop re-purchasing duplicates and use it up.
Here's what Mary the Wonder Organizer taught me:
1. Start by making storage space. Take one area that can be used as prime storage and clear that out first. I originally thought we'd start with the center of the room but she wanted to start with the bookshelves. (I had and still have a lot of books. In order to make sure that I won't revert back to becoming a library again, I'm going to start purchasing more e-books. I still love actual books but there needs to be much more of a mix.) The need to provide a place for the things that would be kept was key.
2. Sort into larger piles. Take items that are kind of the same (or at least living in the same box/basket/container) and decide what stays and what goes.
3. If you say the words, "I hate this!" and then put in the Keep pile (as I did with a bottle of pink paint), then that's a clear sign that it needs to go away. Give it to someone who will love it. (I will always have Mary the Wonder Organizer's face in my mind if I do this again, her sitting in the middle of my fabric stash, looking over her glasses at me with an amused expression and raised eyebrows. Point taken.)
4. The mess always gets worse before it gets better. (I knew this one but I still struggle to remember it when I'm standing knee deep in safety pins and sharpie markers.)
5. You can't keep everything. You just can't, you are one person and the likelihood of you using it all within your lifetime is slim. Period. Let it go, give it to someone who can't afford to buy it for themselves so they can make art and create beauty in the world too.
I'm not going to say that I excelled at maintaining an optimistic view of the situation. At the end of the first day, I was really struggling to keep positive. I sort of gave up early in the evening. Mary the Wonder Organizer was willing to keep working but I found that I couldn't decide what to do with a bag of styrofoam bird eggs, I kept shuffling it from one container to another. When earlier I had been moving swiftly through the piles, letting things go and planning what to keep but suddenly I hit a mental wall.
In the end, I realized it's because I fell back into my old mindset of, "This will never happen. I'm going to be left with the same mess and what will I do then???" I panicked, plain and simple. Luckily, Mary the Wonder Organizer came back the next day and when I told her I was so worried we wouldn't make it into my studio and that's what I desperately wanted done, we both committed to doing what it took to get it done.
The support was invaluable.
The key lesson learned: There is always an end in sight. If you want to accomplish something, keep going. You have to do the work. Take a break when you need to and then come back when you are able to make choices that support your end goal. Stay strong. :)
In the next post I'll talk about the clear containers that I showed in the first post, why I chose those and how I ended up using them in the re-org.
05 July 2013
Reclaim Your Space - Enlisting Help
Just a quick note to announce the winner of the TAP class giveaway from this post (today is the choosing day!) I hopped over to Random.org and asked it to give me a number and here's what it spit out:
That makes Robbie the winner! Congrats Robbie - hope you love the class! :)
--------------------------------------------------------------------------------------------
* This is the second post in a six part series about how I reclaimed my studio spaces.
* See the first post, "Reclaim Your Space - Your Mindset".
After making the decision to tackle the mess, it was time to make a plan on how to get from chaos to organization. I knew one thing for certain: I needed help.
I have tried taming the spaces and heaps on several occasions on my own (you've witnessed it on the blog) and I was not successful for a variety of reasons. If this was going to happen to the extent I needed, I wasn't going to be able to accomplish it on my own.
I chose to work with Mary Dykstra, a professional organizer. The idea for working with a pro came about for several reasons:
1. I wanted someone who, to be blunt, didn't care about my art stuff. I wanted someone who could look at a bag of scrap ribbons and not give me ideas on how to use them. If I wanted to get rid of something, I didn't want anyone trying to convince me otherwise (I'm easily swayed).
2. I needed a lot of help - especially with the labor of it. It felt awkward asking for that from a friend so I decided to remove that discomfort from the equation and work with someone who was doing it for a living.
3. I needed ideas on how to tackle this. I needed help working through the spots that would trip me up - piles, feeling overwhelmed with the scope of the job, deciding what to keep, etc. I knew a pro organizer would stop me from anything approaching a freak out and put me right back on track.
I spent a lot of time poking around on the internet before I called Mary. I liked what she had to say on her website, I liked the way she was so calm when we talked on the phone (I needed the calm) and I liked her positive outlook. No matter how bad I tried to make the situation out to be, she just kept saying, "We can fix it."
Turns out it was the best decision I ever made. She is friendly, kind of goofy (she kept us laughing through the whole thing) and she's really really really really (did I mention really?) good at what she does. Much of the next four posts are things that she helped me learn about my space and myself, I'm truly indebted to her. She left me empowered and feeling in control and kept telling me to stop beating myself up, always look forward.
I realize not everyone can hire a pro organizer. And if you can't, then consider enlisting friends to help. If working through everything in two days is not realistic for you, make a schedule. If I look at the volume of work that was done, it would have easily taken me a year to do on my own. No exaggeration.
The most important thing is that you choose someone to work with that won't judge you, won't make negative comments and will help you with the areas that you need support in. A cheerleader for this kind of work goes a really long way.
The key lesson learned: There is nothing wrong with asking for help. We all need it every once in a while, there is no need to be a superhero. :)
In the next post, I'll share my thoughts on dealing with such large volumes to sort through.
04 July 2013
Reclaim Your Space - Your Mindset
* This is the first post in a six part series about how I reclaimed my studio spaces.
I've come to believe that there is no greater kryptonite to motivation then saying, "I really should ______." (Insert your issue of choice: loose weight, clean out the basement, learn to skydive.)
I've been saying for two years now that I really needed to do a deep dive purge on my Warehouse and Studio. Both are small spare bedrooms, nothing fancy or grand, but precious to me because they are dedicated space to my art career.
I've toyed with the idea of a studio outside of the home. Even entertained these for a brief moment. In the end I kept coming back to the same conclusion - the amount of room I have is not the problem, the amount of things I was holding onto was.
Insert the requisite amount of guilt, shame, dread and embarrassment that comes along with having to face something of this magnitude. All I could think about was the Hoarders TV show and how I didn't want to end up on it one day.
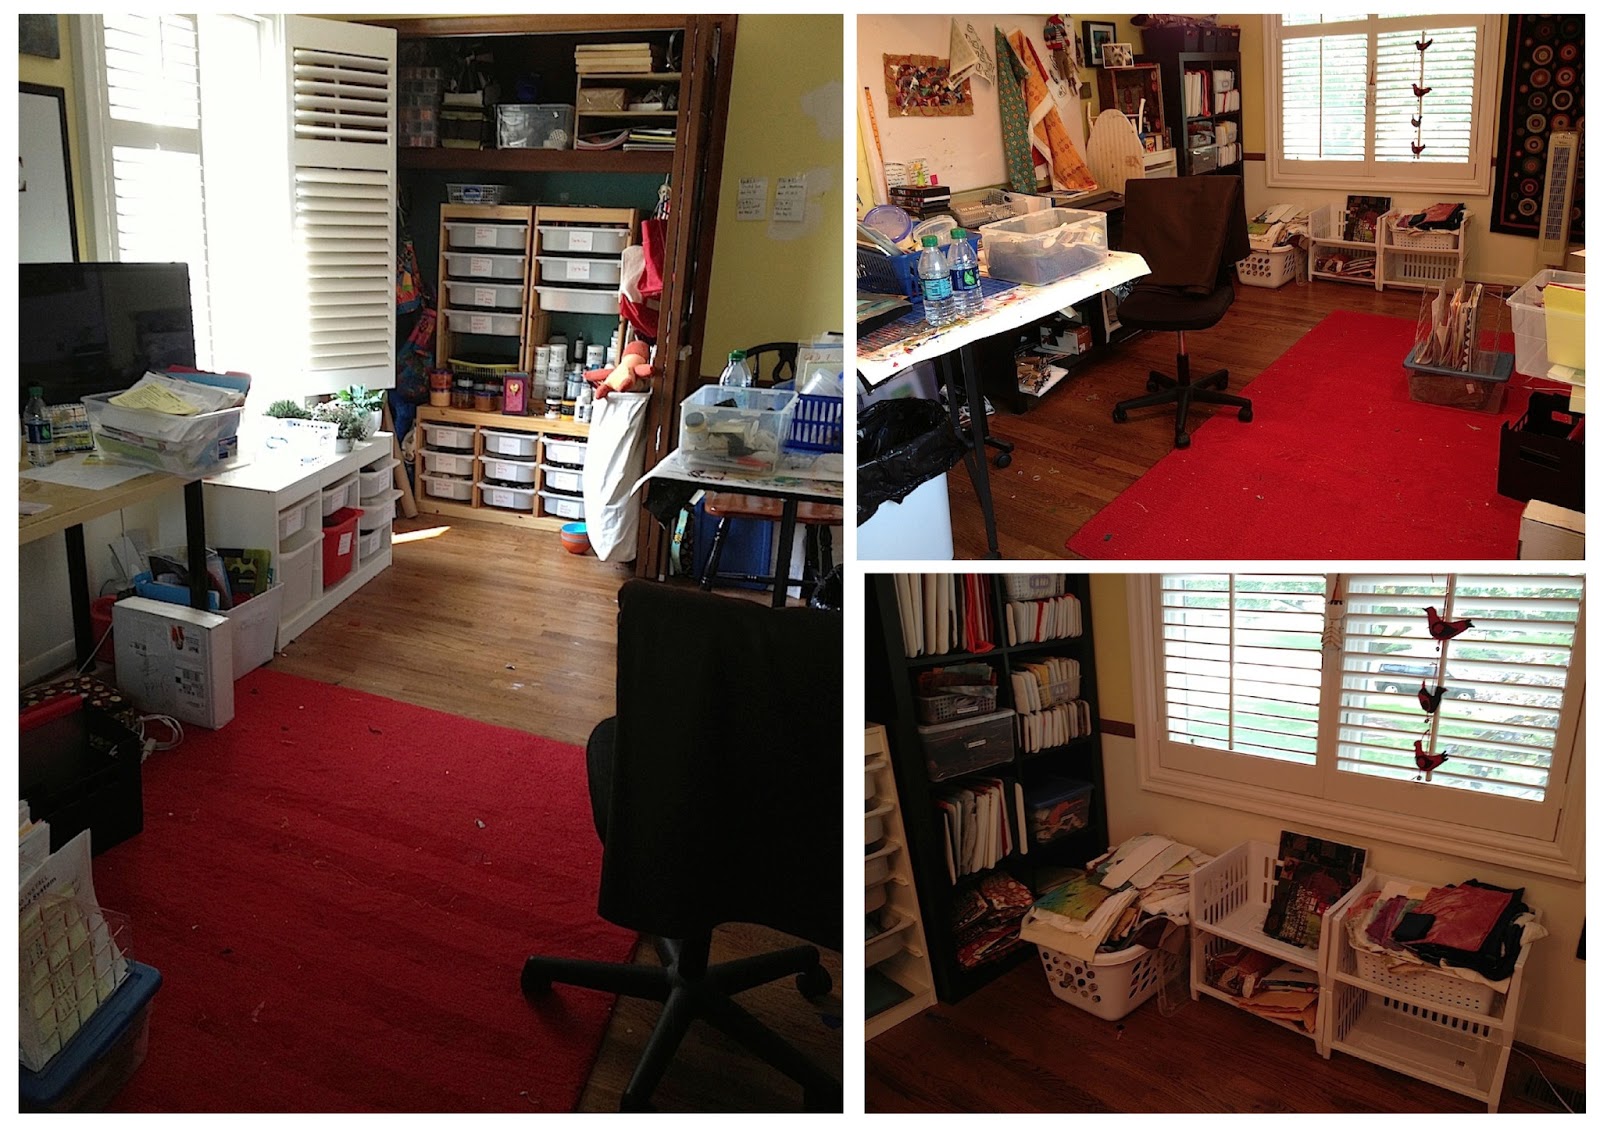
Here are two photos of what I decided to tackle:
The Warehouse Before the Purge
The Studio Before the Purge
I knew that if I was going to straighten it out, I needed to change the way I was thinking first. It's like going on a diet and deciding that you'll never loose weight anyway so why bother eating a banana when you could have an ice cream cone instead? I decided there was no point in investing the time, effort and money if I wasn't going to see it through.
I always need to understand the why behind things. I wanted to figure out how it had gotten this out of control and came up with five primary reasons:
1. Retail therapy - I had used the buying of things to comfort me during some difficult times in my life and since I had no organization system in place (which may not have mattered anyhow considering the volume of items coming in), it got tossed in a pile.
2. All the organization bins and shelves I already have are fine in and of themselves - they just don't serve me well. Not all of them are functional for me so it was not uncommon for me to have a pile on the floor with empty shelves of a bookcase next to it. (Changing them out will happen farther down the road.)
3. I'm not physically able to do the heavy lifting (I have back issues) and needed help with the labor portion. Part of me still struggles with asking for that kind of assistance so that became a major contributor to the mess.
4. I felt a tremendous amount of shame at how messy everything was. Most of it came from the negative voice in my head but any time I would hear a comment from someone full of negative judgement, I ran with it and inflated it a hundred fold, telling myself I was a horrible person.
5. There is a lot of history in the stuff we own. Going through it meant that I would have to face it. Not all of it is bad, heck, 99% of it isn't bad. But there was an emotional element to it that I knew would take a lot of energy.
Take note that these are not excuses, but a clear understanding of where I was beginning.
Armed with that knowledge (I love self introspection, feel like I can tackle anything if I understand the why of it), I bought these:
And I made an appointment with Mary the Wonder Organizer (that is the title I gave her after spending two days with her).
But the biggest thing I did for myself was this - I cleared my schedule so that I would dedicate two full days to the task and nothing else. That meant I waited four months until I was able to take the time, not an easy thing to do when you feel like something is eating away at your sanity. But I said, "Self? It's time to do this for you and see it through. Be brave, you can do it."
Was it easy? No. I was stressed, I was worried. Tackling the whole thing in two days was a really tall order. But I wanted to do it, no matter how uncomfortable or long the days would be. I wanted to clear the mental stress and block that it was creating so that I could be free to continue on my art journey. Yes, it was actually preventing me from wanting to work on new projects and grow my art business.
The key lesson learned: If there is something in your life that is really bugging you, make a plan to change it. Once you have some parameters to work within, you can concentrate on the work rather then worrying about the how. :)
So the work began. In the next post will talk about how I chose to work with Mary the Wonder Organizer and why I think working with someone (friend or professional) is key to success.
** Thank you for allowing me to share this with you. It's a touchy subject for a lot of us and it's always surprising to me how emotionally charged the topic can be - myself included, I really struggled with whether or not I would write about the experience.
But I've always thought that as soon as I hit something that feels uncomfortable to me, it's worth trying to straighten out, means I've come to a part of my life that could use some shining up. No shame, open heart, moving forward. :)
03 July 2013
The Great Studio Purge of 2013 - the aftermath
When I decided earlier this year that it was time to suck it up and deal with the things in my Warehouse and Studio, I had only an inkling of what I would learn during the process.
I figured I would just get rid of stuff and have some clear space and that would be that. But I've spent the past two days with a professional organizer and inside my head and turns out, there's a lot more to it then just having a lot of stuff.
I want to share with you everything that I've learned. I know there is more work to be done but there's a lot of stuff that got done that I'm hoping might be helpful to you if you are also struggling with the same things I am.
Over the next several days, starting tomorrow, I'm going to do a series of six posts, each one dealing with a single topic. Because there's just too much to write about in a single post.
I can tell you two things now:
1. I am apparently concerned that ziploc bags, sharpie markers and safety pins will no longer be made because I have enough to equip every household in Michigan.
2. I am nothing if not consistent and I prove that by the fact that I have purchased the same book four times.
For today I'd like to show you the before and after photos of each room.
The Warehouse Before:
The Warehouse After:
The Studio Before:
The Studio After:
The posts over the next six days will show more specific photos to deal with their individual topics.
Stay tuned!
02 July 2013
will you help me? quick little survey below! :)
*** Don't forget to leave a comment on this blog post
for your chance to win a free online class for using Transfer Artist
Paper taught by Lesley Riley! A winner will be chosen on July 5th. ***
While I am knee deep in The Great Studio Purge of 2013, I thought I'd put up a little survey.
I've got great plans for my new blog (when this one is retired and Smudged Textiles Studio is up and running) and I've always thought of a blog as a virtual living room. Where you all come to visit and we chat and spend a little time together.
So I'd like to know what you think of what I put up here and how I can better improve your visit. I've got a quick nine question survey below and would be super grateful if you'd take a quick moment to fill it out.
* If the embedded survey doesn't work well, you can also get to it here.
Thanks! :)
Create your free online surveys with SurveyMonkey , the world's leading questionnaire tool.
While I am knee deep in The Great Studio Purge of 2013, I thought I'd put up a little survey.
I've got great plans for my new blog (when this one is retired and Smudged Textiles Studio is up and running) and I've always thought of a blog as a virtual living room. Where you all come to visit and we chat and spend a little time together.
So I'd like to know what you think of what I put up here and how I can better improve your visit. I've got a quick nine question survey below and would be super grateful if you'd take a quick moment to fill it out.
* If the embedded survey doesn't work well, you can also get to it here.
Thanks! :)
01 July 2013
The Great Studio Purge of 2013 - Day 1
*** Don't forget to leave a comment on this blog post
for your chance to win a free online class for using Transfer Artist
Paper taught by Lesley Riley! A winner will be chosen on July 5th. ***
So these "before" posts are awkward for me to write. I wanted to take the "before" photos and hide them for myself so I would know how far I had come but every time I thought about posting the photos here, I got a weird feeling in my stomach.
You see, it's somewhat embarrassing, the extent to which the mess has gotten out of control. There are a lot of reasons for it, I've been thinking about it a lot. The biggest conclusion I've reached is that I need to stop beating myself up about it.
It serves no one, mostly myself.
I am where I am and the only thing within my power is to decide if I stay here or face it. I've decided to face it. And since I know I need help, I have chosen to work with a professional organizer. Today is my first day working with her, she will also be here tomorrow. (Although I may be mildly comatose from exhaustion after today so I may not get a post up about it again until mid week.)
I have two rooms that need to be dealt with. One is my studio which you have seen frequently but I also have a second room that I refer to as my Warehouse. Stuff for my etsy shop, my book collection, samples, finished artwork - that's where it all goes so that I don't need to store it in my studio. It is the first heap that is being tackled.
Before I show you the photos, click play on this video. This is my theme song for the purging activities (Think of Rocky Balboa running up that umpteen million stairs while he was training, that's my favorite part.):
And now here they are, the "before" pictures of the Warehouse. The next post will show post pro-organizer state:
Warehouse Before #1
Warehouse Before #2
Warehouse Before #3
Stay tuned...
30 June 2013
where i stand sunday
*** Don't forget to leave a comment on this blog post for your chance to win a free online class for using Transfer Artist Paper taught by Lesley Riley! A winner will be chosen on July 5th. ***
I've talked about wanting organization for a long time. Not perfect, just reasonably under control. I hesitate to show photos, feeling vulnerable, embarrassed, cringing at the judgement that I know people will fling at me.
But I know I am not alone. I know there are other artists out there that share the same struggle. So I'll share the journey, offer a chance to see how to find a way out of not only the physical clutter but the mental mess as well.
Where I Stand
is an ongoing photo
essay examining the
different places I spend my life
standing. Too often we take for
granted the everyday places we
spend our lives walking on.
The ground we tread on has its
own stories to tell.
29 June 2013
win a free online class with The Transfer Queen - Lesley Riley! :)
Do you know Lesley Riley? Do you know about the product she created, Transfer Artist Paper (TAP)? If you don't, you really should and I'm more then happy to introduce you!
Lesley is known as the Transfer Queen and it's for good reason. I first met Lesley many years ago in Houston at the International Quilt Festival. I took a class with her on making a mixed media book and I remember the first time I watched her to do an image transfer - I was completely mesmerized! It was like magic!
In that class she was teaching it with inkjet transfers and matte medium. But since then she has gone on to create a product, TAP, that is SO much better in SO many ways - it makes transfers super magical!
The thing I like best about the product is that it's not just for fabric and you can draw directly on it with markers and other tools to do the transfer. I don't have an inkjet printer anymore (which is the type you need with TAP) so I love that I can still do transfers in a snap with TAP.
You can use TAP on paper, wood, metal, clay - it's an equal opportunity transfer product! :)
Lesley is making it super SUPER easy - and FUN! - to take a class with her. She's teaching all the things you can do with TAP over at CraftArtEdu. Online classes are my savior - I can take them anywhere, anytime and in my pajamas. :)
In Lesley's class, she shows you all the ways you can use TAP and also a project to put all your new wonderful pieces together:
Not only is Lesley a very talented teacher, she's incredibly generous. And she wants to give YOU the chance to take the class for FREE!
Simply leave a comment on this blog post and I'll randomly pick a winner on July 5th. The winner will take the class for free. And what's more is that my blog is not the only place you can enter to win.
Visit Lesley's blog for a chance to win a free package of TAP!
Visit these blogs for another chance to win a free class:
June 26 - Christine Urias
June 27 - Karen Watson
June 28 - Judy Coates Perez
June 29 - Theresa Wells Stifel
June 30 - me! - You're already here :)
July 1 - Claudine Hellmuth
July 2 - Gina Rossi Armfield
July 3 - Carolyn Dube
July 4 - Liz Kettle
July 5 - Jane LaFazio
July 6 - Joanne Sharpe
July 7 - Pam Carriker
Get commenting and happy blog hopping! :)
25 June 2013
it began with one sentence
Remnants Collage 1
10" x 10" on canvas
Lynn Krawczyk
This was the first collage in the Remnants Collage series. Now the series is on it's 33rd piece. I remember the day I made it, something clicked. Something felt like home. And I remember the thing that sparked the work: a single sentence.
Here is what I wrote in my sketchbook when I was considering trying collage work: It is a chaotic mixture of all things past, all things present and the want to make them all sing together.
That's all it took. It made me brave enough to take old projects that were collecting dust and cut them up to reassemble them into new collages.
This is the type of thing that The Written Sketchbook class is about. It is about using writing to connect to your artist self and be aware of how you approach your artmaking. It's also about using writing to generate ideas for new work.
The class walks you through six different types of writing and gives you some exercises to try out. It also shows you other artists that are using writing as an integral part of their art making process. This is more then me trying to sell a class - this is something that speaks from the deepest parts of my Artistic Awareness.
And I want to share it with you.
Class begins on July 21 so there is still more then enough time to grab a spot. Class interaction is being run through a Facebook group and there is swag that comes with registering, including hand screen printed pocket journals:
I hope you'll join me! :)
24 June 2013
23 June 2013
where i stand sunday
Her day spoke of love, respect, trust and completion.
The word to describe it escapes me. Special, lovely, happy - all do not do it justice. All are too weak and overused and without that special feeling that wrapped itself around the edges of everything that happened. It was a joy to stand with Sidney on her day, to watch her happiness and to wish her all the goodness that the future can bring her and her family.
Where I Stand is an ongoing photo essay examining the different places I spend my life standing. Too often we take for granted the everyday places we spend our lives walking on. The ground we tread on has its own stories to tell.
18 June 2013
join me for a LIVE webinar this Thursday June 20th!
Happy, excited - thrilled! I'm doing a LIVE webinar on June 20th (this Thursday!) with Interweave. Woo!
The webinar is about two things that are very near and dear to my heart - color and Thermofax Screen Printing. (Sure you hadn't noticed that I like them.)
If you're unfamiliar with a webinar, this is how it works. You go register here to reserve your spot. You'll get directions on how to connect with the webinar and then on June 20th, I pop on the line and tell you everything I know about Color Stories and making a 3D Color Study and introduce you to Thermofax Screen Printing.
Can't make it at 4pm on Thursday? No problem! You'll get a recording to keep forever sent out to you a couple of days after the webinar airs live. (I registered for Julie Fei-Fan Balzer's webinar that way. She did one on blogging. I couldn't make the live event but I have her webinar on my computer. It's pretty cool, I can make her repeat herself over and over and over and over and over again. She never complains either.)
In my webinar we'll be talking about how to identify your personal Color Story. And then we'll walk through a project to make 3D Color Studies - which are these:
I'm the kind of girl that likes to have something tangible after taking a class so these little projects can be used for more then just a Color Study - home decor, mixed media assemblages, torture a sibling with them. Totally up to you. I'll walk you through the steps during the webinar and then you can replay them to make them later on.
The Color Studies are made with Thermofax Screen Printing and Swipe Printing. So we'll learn all about those two.
All I know is that I don't get to teach in person nearly as much as I would like. So I'm super excited about this new format to connect with all of you - I do hope to see you on the line!!! :)
17 June 2013
perk up your summer shoes with Thermofax Screen Printing! :)
I bought new tennis shoes.
They were too clean and too plain. Thing is, I buy the boring colors because quite often my only other options involve glitter or strange buckles. But I got to thinking this time around, I've got skills. I could turn them into something far more interesting all on my own.
I admit I was a little apprehensive. I've never tried to screen print shoes before but I figured what the heck? What's the worst that could happen?
I thought I'd walk you through how I made them in case you're like me and find yourself wanting shoes with a little more personality.
Hope you enjoy! :)
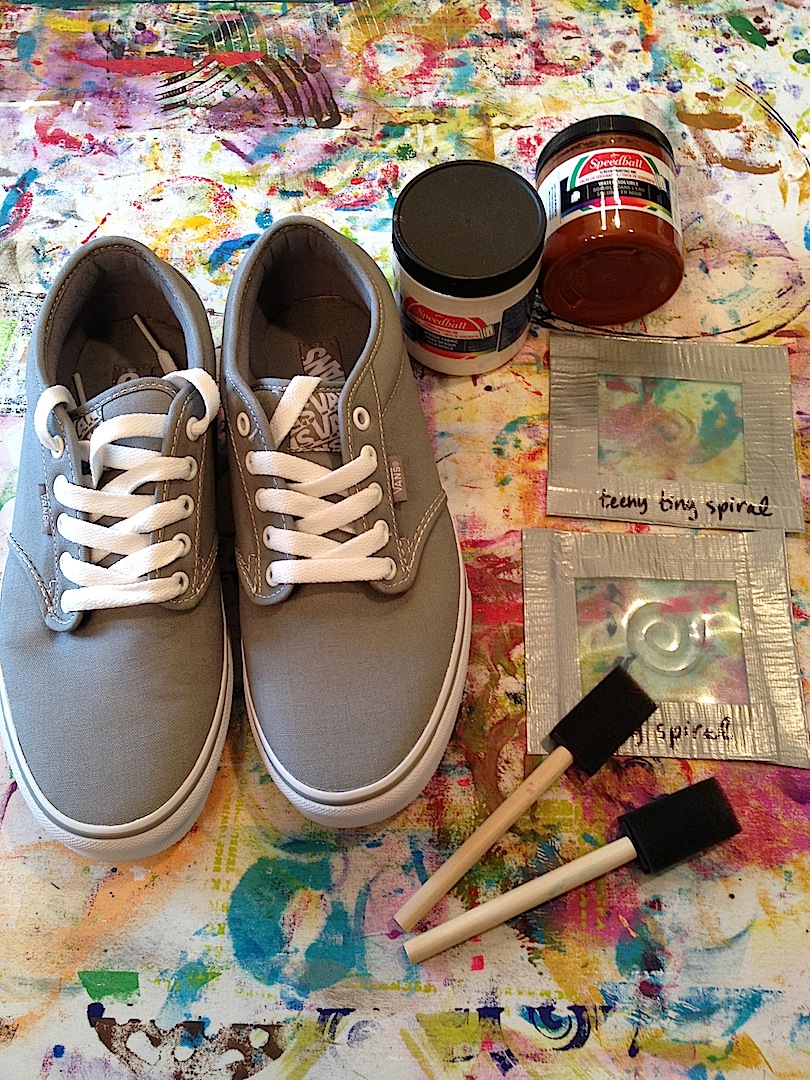
Materials:
* Canvas tennis shoes
* Fabric screen printing paint
* Tiny & Teeny Spiral Thermofax Screen set
* 1" wide sponge brush
I have to say, the tennis shoes I buy are canvas. How "pure" fabric they are, I can't say. But they don't have a lot of coating on them so that's something to be aware of if you're striking out to buy a pair to print.
********************
Step 1:
Stuff the shoes with something so they are firm. (I entertained the idea of wearing the shoes while I printed them. But I decided nothing good could come of it and opted to find a better solution.) I had some acrylic craft felt laying around the studio so I used that. The idea is just to give yourself a firm surface to print on.
********************
Step 2:
Place the tiny spiral on the shoe in a spot where you want it to go. Hold it down with one hand and print with the other:
Brush the screen printing paint through the screen with a sponge brush. Peel the screen back carefully and repeat on different places on the shoe until you're happy with the number of spirals you've printed:
The uneven surfaces of the shoe make it a challenge to get a really clear print. So I decided to embrace the imperfect print and just go with it.
Repeat the same printing on the other shoe. Let these spirals dry completely before moving on to more printing.
********************
Step 3:
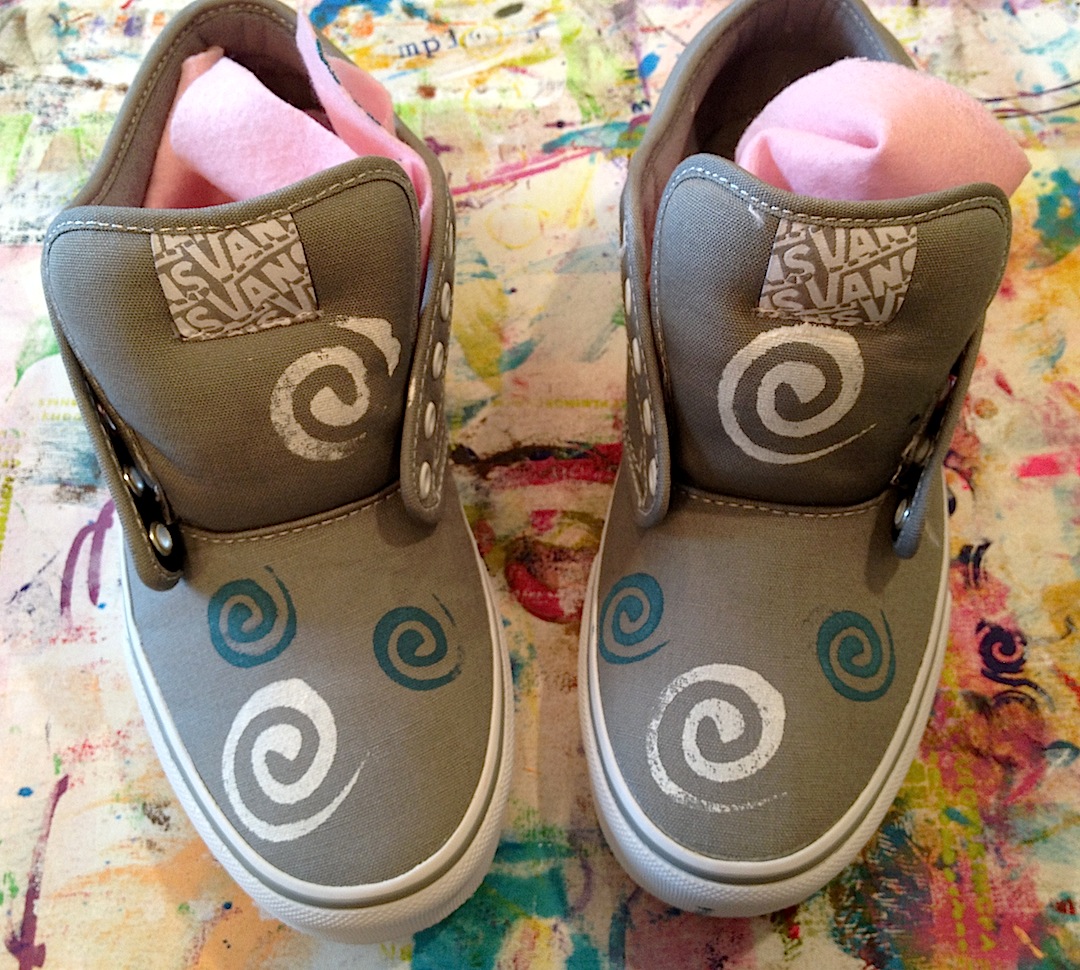
Repeat the printing process with the Teeny Tiny Spiral in a different color. I chose blue this time around.
Add as many spirals around the shoe as you like. Repeat for the other shoe.
At this point, things look pretty good:
You could certainly stop here. But I kept looking at my print table and at the shoes and then back at my print table. I decided I want to mimic the wonderful chaos of the fabric that covers the table and did some more printing.
I printed four more layers:
1. The BE Thermofax Screen printed in brown paint.
2. The Birds on a Wire Thermofax Screen printed in black paint.
3. Swipe Printing in purple.
4. Swipe Printing in yellow.
LET EACH LAYER DRY BEFORE PRINTING THE NEXT. (Yes, I meant to shout that.)
Why no pictures? Because I got carried away and forgot to take them. (It was a paint bliss fit, I take no responsibility for myself when that happens.)
But I will offer some explanation.
You can see that the brown and black printed images are really smudgey. That's because the screens aren't small like the spiral ones and trying to force them around the shape of shoe proved to be a serious pain in the you know where.
What I ended up with was really messy prints. I'm okay with it, I like the look but you need to be aware of it if you like clear neat prints - not sure you'll get them with the larger screens.
Once I realized I had gone the messy route, I decided to just go for it. I did Swipe Printing first in purple and then in yellow. What in the world is Swipe Printing? Dip the end of a sponge brush into paint, dab it twice lightly on a spare piece of fabric or paper towel and then quickly and lightly swipe the paint across the project you are printing.
Easy peasy. Adds color and depth. Plus it's a relief from the graphic nature of Thermofax Screen Printing.
I gave them a whirl in the dryer for about 20 minutes to heat set the paint. Ironing seemed like a poor idea. It was noisy but I'm pretty sure it did the trick. Watch the heat setting, I went the medium route. (You could also let the paint cure for about a week to make it permanent. But who has time for that?? Try the dryer.)
In all honesty, this kind of project is why I love Thermofax Screen Printing so much. I did it on the fly, in the spare seconds I had in the day and just rolled with it.
If you're interested in future project suggestions like this one, please swing by the Thermofax Screen Printing Facebook page and give it a "Like!" so you don't miss anything. And if you print your shoes, please send me a picture at FibraArtysta@earthlink.net and I'll post it to the Facebook page for everyone to admire! :)
"The Creative Habit" read along - Chapter 7
If you would like to join
the closed Facebook group dedicated to this read along to discuss the
book in more detail, please send an email to Lynn at
FibraArtysta@earthlink.net with your email address.
This is the sixth installment of the read along for "The Creative Habit" by Twlya Tharp.
Chapter 1 and 2 of the read along can be found in this post.
Chapter 3 of the read along can be found in this post.
Chapter 4 of the read along can be found in this post.
Chapter 5 of the read along can be found in this post.
Chapter 6 of the read along can be found in this post.
* Posts will go up on Mondays from now on instead of Sundays. Thanks! :)
Chapter 7 - Accidents Will Happen
This chapter is one of my favorites. It deals with the ideas of planning and serendipity. Tharp calls it "being prepared for luck."
She says, "The key words here are "prepared" and "lucky." They're inseparable. You don't get lucky without preparation, and there's no sense in being prepared if you're not open to the possibility of a glorious accident."
In other words, if you don't do the work and hone your skills, there's no chance that luck will show up and do the job for you.
I've always skirted this idea, not liking the thought of relying heavily on chance. I know some artists that do and it seems to work for them but for me? I need to at least lay the foundation before I let my creative energy wander off on a tangent. I don't want to burden it with having to do everything.
It's a fine line between planning and letting go. I'm a dweller, I like to spend 80% of my time on a project thinking and daydreaming and pondering and the final 20% executing it. It used to stress me out, made me wonder if I was simply a procrastinator. But the more in tune I became with my process, the more I realized that that is my process.
Letting go is not the simplest path. It's easy to get tied up in the way something looks in our heads and to want to force it to go that route. I don't know about you, but I've never had much luck when I try to do that. Those are the kinds of projects that get chopped up and used in collages. ;-)
How about you? How do you handle the balance of preparation and luck?
Next Monday we'll discuss Chapter 8 - Spine. Happy reading! :)
16 June 2013
where i stand sunday
I noticed the little twigs gathering beneath the wreath on the front door earlier this week. One or two, then more, then tiny unexplained mud splatters on the glass door. It wasn't until a sharp twill from a worried bird that I thought to look upward. A perfectly engineered nest is snugged in between the front door glass and the decorative wreath - a sanctuary of hope in which new life can begin.
Where I Stand is an ongoing photo essay examining the different places I spend my life standing. Too often we take for granted the everyday places we spend our lives walking on. The ground we tread on has its own stories to tell.
I tipped my camera up, carefully so I wouldn't touch the nest, and managed to get a good shot of it's contents. It will mean not using the door as often, altering the way I go about my day. But it's life and the switch will be temporary, I'm happy to oblige.
13 June 2013
10 June 2013
collaboration with Lisa Call
There's only one thing I like more then printing fabric (and you all know how much I love flinging paint) and that's sending it off to other artists for them to use in new ways that I wouldn't ordinarily think of.
Last summer I talked with Lisa Call about doing just that and was thrilled when she agreed to collaborate! Lisa is a master at piecing and machine quilting textile paintings. I have tremendous respect for not only her artwork but also for her dedication to her craft, it shows through in everything she makes.
As is her habit, she took the fabric and worked magic on it. I printed a red piece of fabric with blue Thermofax Screen Printed circles and a purple piece of fabric with some hand drawn paint doodles on it. She incorporated them into her "Portals" series.
I love that she combined them with her own hand printed fabric! Here are a couple that I am just totally in love with:
Her meticulous, perfect machine stitching is such an incredible contrast with the patterns already present in the fabric - don't you love the way they play off each other?
Lisa blogged about it here.
There is so much joy in putting fabric out into the world, I feel like I'm getting to be a cheerleader for new artwork. :)
09 June 2013
where i stand sunday
I am a slave to the pattern, the never ending mark that can't find it's own beginning or end. It's the first shape I turn to when I put paint to fabric, an abstract kind of rhythm that never ceases to amaze and impress me.
Where I Stand is an ongoing photo essay examining the different places I spend my life standing. Too often we take for granted the everyday places we spend our lives walking on. The ground we tread on has its own stories to tell.
03 June 2013
The Creative Habit read along - Chapter 6
If you would like to join
the closed Facebook group dedicated to this read along to discuss the
book in more detail, please send an email to Lynn at
FibraArtysta@earthlink.net with your email address.
This is the sixth installment of the read along for "The Creative Habit" by Twlya Tharp.
Chapter 1 and 2 of the read along can be found in this post.
Chapter 3 of the read along can be found in this post.
Chapter 4 of the read along can be found in this post.
Chapter 5 of the read along can be found in this post.
* Posts will go up on Mondays from now on instead of Sundays. Thanks! :)
Chapter 6 - Scratching
I've been asked on more then one occasion where I get my ideas from. (I'm sure you have as well.) People seem to find me particularly curious since I do abstract work. They look at me like I'm something to be studied because clearly my brain takes a sharp left turn in the imagination department since I'm creating work that has no tangible relation to something real.
Truth is, I can't explain how I get from inspiration to product. And believe me when I say I'm always trying to define it. But it's one of those things that mostly comes down to wiring. I find this chapter of The Creative Habit especially interesting because Tharp talks about that odd zone where ideas are mashed around until we find the one element that we can grab onto and create something from.
Fact is, we often look to external elements in order to gain internal inspiration. Twyla Tharp calls that "scratching."
She says, "Scratching can look like borrowing or appropriating, but it's an essential part of creativity. It's primal, and very private. It's a way of saying to the gods, "Oh don't mind me, I'll just wander around in these back hallways..." and then grabbing that piece of fire and running like hell."
Ideas are something I'm generally not short on. My brain constantly churns and I have a list that I dump them all into just to get them out of my head. But when I look back at every idea I have, very few of them actually see the light of day and I've always wondered what in the heck the point was to recording them if I don't plan to act on them. (Aside from the obvious "Write them down for later so I don't drive myself nuts trying to remember everything.")
Tharp says it perfectly in this passage about good vs. bad ideas: "A good idea is one that turns you on rather then shuts you off. It keeps generating more ideas and they improve on one another. A bad idea closes doors instead of opening them. It's confining and restrictive. The line between good and bad ideas is very thin. A bad idea in the hands of the right person can easily be tweaked into a good idea."
But getting to the good ideas isn't always easy. So that's why we "scratch". It's the thing you do when you need the next big inspiration but it's not showing up on it's own. For me, I go to the bookstore. I grab a giant pile of books, sit down in an oversized chair and let the chatter of the coffee shop and people laughing meld into a white noise. I stick my nose into books on topics I've never considered before and just zone out. (I probably look a little bit like a deer in headlights.) And with any luck, something occurs. More often, nothing comes of it but when an idea hits that I do the little gasp over, I know I've hit the nail on the head.
I've always likened ideas to dating. Some of them are instant magic and others are one time shots with a side of loosing his phone number.
Not everything will be made. Not every idea will be good. The trick is to be aware of this and let them take their own course. Choose the ones that make your heart sing and leave the others on the sideline to just be.
How about you? How do you scratch?
Next Monday we'll discuss Chapter 7 - Accidents Will Happen. Happy reading! :)
02 June 2013
where i stand sunday
I set the cup down on the floor in front of me so that I can listen to the lecture, a conversation about where coffee comes from and how it's roasted and different ways to make it. It's a constant in my day, this simple liquid that ramps up my mind so that I can move through my tasks. I take it for granted, not realizing all the steps that it goes through before it comes to me. It makes me feel small somehow, knowing that I am the end of the journey and by far the least significant.
Where I Stand is an ongoing photo essay examining the different places I spend my life standing. Too often we take for granted the everyday places we spend our lives walking on. The ground we tread on has its own stories to tell.
The lecture was part of Coffee Camp at Roos Roast in Ann Arbor, MI. An exceptional coffee company run by exceptional people. The enthusiasm and care they show for their business is incredible.
Roos Roast van featuring the logo for one of their most popular coffees, "Lobster Butter Love"
Newly roasted beans.
01 June 2013
re-branding activities - Smudged Textiles Studio :)
Things are beginning to move swiftly for the new business name. I've got this incredible logo for the new website designed by Jackie and I finally got off my duff and got everything to Holly for her to start working her magic with the new website/blog. And I've got an incredible team to help make the business extra special and grand.
Having a pretty solid online presence, I knew that re-branding would be a bear. It means that I also have to switch over all my social media names and to be honest, that's a fairly terrifying prospect. But it's underway so I wanted you to be aware of it. Here's what's new:
Facebook - My personal page is the same but I'll be deleting this page at the end of the month. I've already put into place a new page for Smudged Textiles Studio and there is a dedicated Thermofax Screen Printing page being designed as we speak.
Twitter - I've already changed my profile name to Smudged Textiles.
Etsy Shop - The shop name will change from FibraArtysta to SmudgedTextilesShop on June 13. Why not SmudgedTextilesStudio? Because Etsy shop names can only be 20 characters and SmudgedTextilesStudio is exactly 21 characters. Murphy's law, right? ;-) If you have me marked as FibraArtysta, your links will automatically update.
Pinterest - I've already changed to Smudged Textiles there as well.
Instagram - No change there, my username is still girllovespaint. (I do.)
Blog- Eventually I'll stop posting here and will only be posting over at Smudged Textiles. But it's not ready yet, we're still at the beginning of the building stage and trust me, I won't be shy when it happens about letting you know.
I'd be lying if I said all this didn't scare me a little. It's a lot of change to take on. But it's the good kind of scary because it means that everything I've always wanted to do can finally begun to be built up.
So stick with me, I don't want to loose connection with any of you. We're trying to make it as painless as possible! :)
Subscribe to:
Posts (Atom)


.jpg)