12 November 2010

craft tutorial: the art of gift wrapping part 1

There's no denying it - the holiday season is about to hit us a like a runaway train. I can feel my to-do list growing to epic proportions already.

When I was in the store the other day I wasn't really surprised to see all the Christmas stuff out. Its everywhere - crowding the aisles, hanging from the ceiling, decorating every end cap. I spent some time browsing through the gift wrapping section. It never ceases to give me sticker shock.

As I was standing there looking at a $6 price tag on a roll of wrapping paper that probably wouldn't wrap anywhere near the amount of presents I'll be handing out, I had a big fat "duh" moment - I should make my own wrapping this year! And I could screen print it! (That got me totally hyper about the idea, you know how I love to screen print everything.)

Not only would it make the gifts more unique but it would save me some cash too. When I added up what it would cost me to buy paper, tags, bows and boxes, it came out to more then $30.

Heck, I could buy gifts with that money. Or yarn. (One can never have enough yarn.) Or both. Why should I spend it on wrapping??

So I came home and made a little list to see if it really is more economical to do this on my own. Here's what I came up with:

* brown kraft paper from the $ store = $1
* micro mini thermofax screen = $3
* bottle of paint = $3.50
* one yard of cotton fabric for ribbon = $3
* two yards of osnaburg fabric = $6

That's a total of $16.50. I'd pay less if I used the discount coupons Joann's sends out on the fabric. That would lop off another $3.60 which would bring my cost down to $12.90.

That's less then half the cost of commercial stuff. And in all honesty, that's only if I decide to use both fabric and paper for wrapping. If I chose one or the other, you can knock even more off the cost.

Not too shabby.

I've been puttering around in my studio the past few days coming up with some different things you can do to not only put a unique spin on your gift wrapping this year but to also save a few bucks. I did such a good job that when I was editing the photos, I was a little surprised at how much I had to say on the topic.

So in an effort to keep your eyes from glazing and rolling into the back of your head from boredom, I decided to split the whole thing up into four posts. Here's what I've got for you:

Part 1 - Screen Print your Own Ribbon!

Part 2 - Fabric as Gift Wrapping

Part 3 - Screen Printing Your Own Paper

Part 4 - Sprucing Up Brown Craft Paper

Part 5 - Easy Decorations for Gift Bags

Told you I got carried away. The thing I got to thinking about was that while its true that I do most of my gift wrapping at the holiday season, I give gifts all year round so its something that I could do for all occasions. That makes me happy, knowing that I can do it all myself and not have to depend on finding just the right thing in the store.

I'll be posting them over the next week. Each part will walk you through the steps needed to turn these:


into these:


So without further ado, let's screen print some ribbon!

What you'll need:

* cotton fabric (the cheap stuff will do, you can get it as low as $2.99 a yard - don't forget to use 40% off coupon!) in various colors
* micro mini thermofax screen (you can also use larger sizes if you already have them)
* bottle of paint
* sponge brush


Step 1

Tear or cut your fabric into strips. I tore my strips along the width of the fabric, which was 44". This is a nice length that is reasonable to screen print.

I like lots of colors so I bought quarter yard pieces to get a variety. I like raw edges on fabric so I tore mine but if you like a more finished edge, you could cut them with a rotary cutter, fold under the edges and give them a quick whirl through the sewing machine to create a clean edge.

Osnaburg is a nice fabric if you'd like a natural, organic feel to your ribbon.

I created strips in 1", 2" and 3" widths.

Give your strips a good pressing:


* * * * * * * * * * * * * * * *

Step 2

Lay the fabric strip on your print table and begin printing at the end of the ribbon farthest away from you:

If you need a reminder of basic printing techniques, my basic screen printing video is a good refresher.


* * * * * * * * * * * * * * * *

Step 3

Continue to print down the length the ribbon.
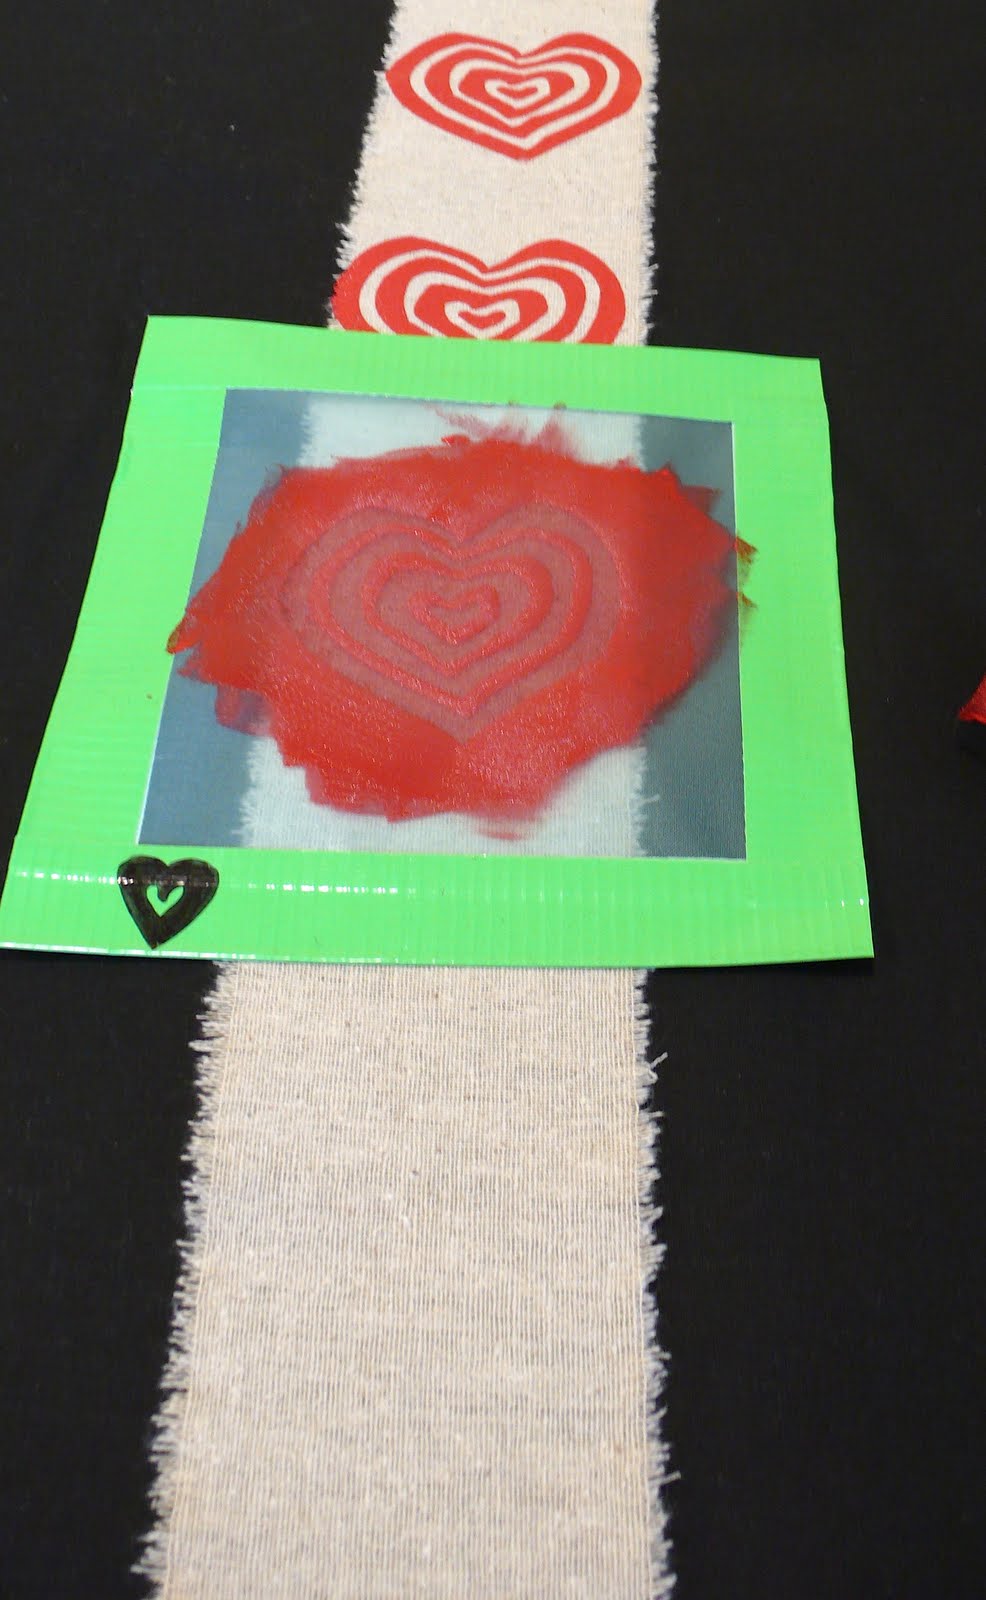


Remember that you are dong repeat printing on these so check the back of your screen frequently for paint splotches:


For help with repeat printing, I've got this video for you. (The screen I'm using up above is the nested heart micro mini screen.)


* * * * * * * * * * * * * * * *

Step 4

Print to the end of the ribbon and set it aside to dry! And that's how easy it is!


Other ideas:

Tilt the image to create a more interesting pattern:

(bulb screen)


Alternate different size images:


(tweet & baby tweet screens)


Use a large size screen to print more then one ribbon at a time:


(mod squares screen)


There's really no end to the variety that you can create by printing your own ribbon! I got so excited I can't even tell you how many I printed.

If you want longer lengths of ribbon for those mega size packages, I still recommend printing 44" lengths. You can attach strips together to create longer ones either with some fabric glue or stitching the ends together on the sewing machine.

And that's all there is to this part! Hope you enjoyed it!

Check back tomorrow for Part 2 when we wrap a package in fabric. :)

11 November 2010

pausing for happy things


My mother told me that from the time I was little, I was a quiet studious kid. I'd sit and watch everything around me. I'd also be the kid who would crawl behind the dresser so I could see what was there or the one sitting on the floor pulling apart the easy bake oven to try to figure out how it got stuck together.

Its not a wonder that I decided to go into engineering when the time came for me to choose a career. Its been a balancing act, trying to make this engineer brain and this art brain live peacefully together. They don't always get along but I find that it makes for an interesting combination that never really leaves me bored.

The problem is that I love working on things. I've always got several projects going at one time, I'm not happy unless my schedule is full. At the beginning of this year I decided that my work-a-holic self needed tiny reality checks. That I needed to be reminded to pick up my head every once in a while from the work load and take a look around me to see what was going on.

I decided to start the 365 Happy Things Project.

Its a simple idea: take a picture everyday of something that makes me smile and put it up on a blog.

I've mentioned it here time and again but I think it bears repeating again. Especially this time of year when the holidays pump our to-do lists up to epic proportions. I'm a wee bit behind on my count. I needed to take a little hiatus this past fall when things got too busy for me to see straight. But now I'm back at it and its a little bright spot in my day when the picture goes live.

I got to thinking today about the project and all the things that I'm working to accomplish in my life. And I realized that they are related. I work to accomplish my goals so that I can build a life that I enjoy, that satisfies, that makes happy.

So as we head on into the craziest time of the year, I thought I would do a little recap of some of my favorite happy things that I've posted so far. Please go visit the project's blog, its a friendly place that always likes new friends.


09 November 2010

a chance to win a free screen & paint!

Do you know Jo and Dylan from Cart Before the Horse? If you don't, then you've no idea what you are missing!

They are just about the most talented doll artists on the planet. They are quirky and creative and very positive happy people. (Can you tell I'm a fan??)

I sent Jo a thermofax screen to tinker with and this is what she created:


My heart just goes pitty pat at the sight of that jolly skelly. Isn't it great!

I mentioned that I thought it would be fun if she offered a giveaway for a screen and a bottle of paint for her readers. So she's doing just that!


All you have to do is pay a visit to her blog and leave a comment on this post. (Trust me, you'll visit her blog often, its super fun so be sure to add it to your favorite blog links.) You've got until Sunday November 14, 2010 to leave her a comment and then she'll choose a winner. Then you'll get to tell me what screen and paint you want!

So don't waste time, get on over there and comment for a chance to win!


**Photos and graphic posted here with permission.

08 November 2010

shop update - the obsession continues


I am a thermofax screen printing addict. I'm sure you hadn't noticed. I mean, its not like I never talk about it here or anything. (Insert heavy sarcasm...)

I popped some new designs in the shop last night and wanted to help share the obsession by giving them a wee little mention here.


Screen printing really doesn't get any easier then this. I have several customers who purchase screens from me after buying a home screen printing system (we won't mention any names) and finding it was hard to work with.

I've taken alllll that work out of it for you. You can screen print your tote bags. Your clothes. Your curtains. Your greeting cards. Anything that will stand still and lacks the ability to complain (which is the polite way of saying you may want to avoid printing on living things, they generally don't like it).

Go forth. Screen print the world with reckless abandon. Be wild. Join the obsession!

07 November 2010

where i stand sunday


The scent of autumn is what draws me into the season the most. Floral margins, dust from cracked leaf edges, dampness that draws the smell of the earth to the surface. The perfume of decay is intoxicating. Its when I'm most aware of the world around me, when the ground and trees throw themselves into the business of resting, of receding for the long winter.


Where I Stand
is an ongoing photo essay examining the different places I spend my life standing. Too often we take for granted the everyday places we spend our lives walking on. The ground we tread on has its own stories to tell. (The project is now in Year Three. Year One and Year Two can be found here.)

05 November 2010

taking a breather

I admit it - I am a workaholic. When I set my mind to accomplishing a goal, I dig my heels in and allow the obsession to take hold and often work myself into the ground to accomplish it.

Its part of my nature and while its often not a bad thing that I am so focused, it means I can easily burn myself out. I'm sort of heading that way. I've been working like a fiend to build up my thermofax screen business and I'm in the midst of prepping things for another craft tutorial and another big shop update.

Its turning me into a bit of a studio troll.

I decided that a bit of human interaction was in order. Kismet was on my side because just as I was thinking that, I got the newsletter from Art & Ideas, a local art gallery run by Shaqe Kalaj. Leann first introduced me to her when she was putting on a show of her woodcuts.

I fell in love immediately. I'm a huge fan of monoprints and block printing.

Shaqe teaches classes and she has one on Thursday evenings that are mini intro classes. Last night she ran one on lino cutting and I jumped at the opportunity to take something with her.

I've done some block printing in the past but its been a while and there were things that I did that I'm sure could have been done easier. So I signed up for the class and learned quite a bit in that ninety minutes.

One of the things that Shaqe does is she colors the block with sharpie so you can actually see where you are carving. I thought this was genius. Since I normally just carve freeform, it was tremendous help to be able to see the design develop as I went along rather then crossing my fingers and hoping I was getting it right:


I also liked the way she showed us to burnish the image - just a simple plastic spoon:


I did a few prints and found that I either was putting too much ink on the block or not enough:


I think its because I was using black ink to print and the block was colored black for carving. I'm going to try printing this design with some red block printing ink I have lurking about the studio and see if I can get a more even print. I just couldn't see where I was putting the ink with everything being the same color.

I like coloring the block for carving so I'll probably use an obnoxious color like hot pink on future ones. I'm not likely to print hot pink prints.

The carving material she gave us was thick enough that we could carve on both sides. Here is my second design:


I'm not done picking at it yet. I'd like to carve some more out of it and do some more printing.

I'm really enamored with this, I want to order some more carving blocks. I'm undecided if I want to just keep going with the line compositions or actually focus it in on a specific thing. The tedious detail of carving all those little lines is really appealing to me.

Another obsession begins...

01 November 2010

starting with intention

Sometimes I feel like my artwork is like the jewelry they show on the home shopping networks. It looks all grand and big on the screen so you order it and dream about how impressive you'll look strutting around with it. Then you get it and its this little thing that fits neatly in the palm of your hand and all you can think is "What the hell?"

This has happened several times when people first see my website and then see my work in person. (Never mind that the dimensions are listed, I'm guilty too of not really paying attention to those things either.)


on the line 2
7" square art quilt on 8" square canvas


I make no apologies for working small. Its been a matter of much debate to many fiber artists and I'll be honest, it irritates the hell out of me. Ever see the Mona Lisa in person? (And no, I'm not comparing myself to Da Vinci.) Its only 30" x 21" yet when I saw it at the Louvre when I was in Paris, the crowd was twenty people deep. I couldn't get near it. And I don't recall anyone saying, "Boy, that Da Vinci was one lazy painter. If he was a real artist, he would have made that bigger."

Small work. Big impact. Get the point?

I've made specific efforts to keep my work from looking like pot holders. I don't bind it. That screams quilt to me and since, for me, stitching is not a structural part of my work (its just there for looks), I abandoned the idea of binding a long time ago. I also like the little bit of fraying that happens around the edges. The rawness speaks to the nature of fabric and I dig that.

Lately I've been placing my pieces on canvas. I love how it looks (and will be posting a tutorial on how I do it, I've had a few questions about it) and I think it elevates the work. You can use the canvas as an additional design element and it makes hanging the work so much easier. Not to mention it gives it a solid presence on the wall since it mimics a frame.

Now, with all the being said, I'm going to completely contradict myself. Part of me has always longed to make a grand work that could cover the wall of my bedroom.

Something just for me, no show deadline, massive in size. Just to see if I can, just to see how it would effect my work flow, just to see if my style could stand up to being blown up so large.

Some of the factors that have kept me from taking the plunge are:

1. I hand stitch my work. I don't plan to alter that. Not only because my sewing machine can be the spawn of the devil, but because machine stitching doesn't feel like my style. The crooked uneven hand stitches are me.

2. Work space. I'm beginning to think that if I hang the work on my design board, I can stitch on it that way. (Can you feel the crazy already creeping in?)

3. I work abstract. I always have a focal point in my work but larger works demand more. This could be tricky.

Still, I'm curious to see if it could work. I look at Kathy Nida and Linda Colsh (two of my favorite artists) and the grandness of what they produce is so inspiring.

I've got a hunk of black felt that measures 36" high x 48" wide tacked up on my design board right now. (I don't use traditional batting, I use felt for my middle layer.) It seems massive. The largest thing I've ever made to date is 20" x 24".

I don't have a subject yet, I don't have any idea what fabric I want to use. I think I want to print some new stuff for this one. Maybe do some deconstructed printing.

But I have intention and here's hoping that's enough to figure out the rest.

Game on Behemoth, you and I are going to duke it out.


31 October 2010

printed project sunday - guest blogger jackie lams

When I taught my Basic Screen Printing using Thermofax Screens class a couple of weeks ago, a good question came up: can you dye screen printed fabric/projects?

Its not something I've tried yet and when I said I wasn't sure, Jackie immediately piped up and said, "Want me to try it???" (And yes, she was giddy about it. The girl loves a challenge.)

I said sure and asked if she would like to do a guest blog post for Printed Project Sunday. Which brings us to this post.

So without further ado, Jackie answers the question: "Can you overdye screen printing?"


* * * * * * * * * * * * * * * * * * * * * * *

*Text and photos are courtesy of Jackie.


A few weeks ago at Lynn's Thermofax workshop at the Northville Art House, Lynn mentioned that she had not dye tested the Plaid Simply Screen Paint. Since I have been looking for a good excuse to break out the dye supplies, I promptly volunteered to test out the product for her. I have a large tote bag from Dharma Trading Company that has been waiting for a surface treatment and fabric dye opportunity such as this.


For this test I used Dylon Fabric Dye. It's cheap, quick and easy. There is a decent array of colors to choose from and the supply list is much smaller than supplies for MX Pro dyes. (*Note from Lynn: Dylon dyes come from the UK. You can find them at Joann Fabrics, Michaels and Hobby Lobby. The fixative for these dyes is already included in the packet so all you need to do is add salt to the solution and you are good to go.)

Don't worry, I'll be testing with MX Pro (Procion) dyes very soon. So first step is to screen print the fabric you wish to dye. I used French Roast brown and a lovely Pond Scum metallic green. The screens are from Lynn's Etsy shop. The ones I used are Threadbare and Bubbles. Let the paint dry completely. Here's the bag all printed and before the Dylon bath:


Make sure you heat set your printed fabric thoroughly before you dye it. I ironed the bag's printed surfaces with my iron set on lava hot. Then, just because I am overly cautious sometimes, I put the bag in the dryer on high for ten minutes. Just to make sure everything was set.

Next I gathered up a five gallon bucket (that I use just for dye), a big mixing spoon (also not used for anything but dye), one smaller plastic container to mix the dye, warm water and salt together, and an apron for myself. Then I followed the directions on the package. If you've done Procion dye work before, you will love the short list of steps to follow for Dylon. I submerged the damp bag into the five gallon bucket.

Here it is soaking in a warm, brown bath:


The paint did appear to morph a little while dyeing but it didn't stay that way. So I stirred the bag and moved it around to make sure everything got exposed to the dye. I watched the clock and stirred some more. When time was up, I removed the bag and squeezed some of the excess dye out of it. Then I chucked it into the washing machine and put it through a cold rinse cycle.

I then washed it in a complete cycle with some Synthrapol. I checked the water at the rinse cycle to see how much dye was coming out and found it pretty clean. I allowed the bag to air dry overnight and then finally ironed it out several days later.


It came out pretty good! The paint held up perfectly! I will probably do more surface design on the bag over the winter months but for now, this will do just fine.

Next round I'll heat things up with some MX Pro dye and a mircowave!


* * * * * * * * * * * * * * * * * * * * * * *

Thanks so much Jackie! The bag looks awesome - hope you all enjoyed this tutorial as much as I did!


Printed Project Sunday highlights artwork that features hand printed fabric or paper. The methods vary from traditional screen printing, deconstructed screen printing, thermofax screen printing, monoprinting, gelatin plate printing - anything you can think of!

They will also include tutorials and various projects featuring thermofax screen printing (I'm an addict, what can I say?)

If you would like to have your work featured on the blog, send an image and explanation of your work to FibraArtysta@earthlink.net
All work, images and text are copyright of the contributing artists and are posted with permission.

29 October 2010

different versions of cute


Its no secret that my artwork and writing tend to lean toward the moody side. There was a time when I tried to change that, make it more upbeat and what I thought people would like. I found that I got a poor response to that work, probably because it wasn't authentic and it showed in every stitch.

So I went back to whatever struck me when I happened to be working and there has been a consistent level of seriousness to what I make. Not all of it has a deep meaning, not all of it is tragic but I think its safe to say that I don't do cute.

But as I continued to work on my studio reorg (again), I realized something strange.

Perhaps I do do cute. I have to say that it was a little bit of a shock. But the proof is evident, I can't get around it.

For a while I've found myself picking up random pieces of commercial prints. Those mod retro ones and plaids (I blame it on having to wear a catholic school girl uniform for twelve years) are my ultimate weakness. Its resulted in plies like these:


I knew the fabric was there (I bought it after all) but I didn't realize how much of it was there. Its been a while since I've had a good reorg of the fabric stash.

All I could think was, "I seem to like cute."

I will say that I have a particular way that I like to use these fabrics. I like to make plushies like these wishing owls that are still waiting for faces and pockets:


There has to be a certain level of quirkiness or weirdness for me to accept its cuteness. Like these piggy plushies I just got from Kate. You can't help but squeeze them every time you walk by them. See? Totally quirky cute.

It doesn't seem to stop at the fabric, though. The cute spilled over into this as well:


I needed eyes for my wishing owls and didn't have any interesting buttons in my stash. So I went button shopping.

And they are? Come on, say it with me: c-u-t-e.

I don't know why I find this amount of cuteness so surprising. After all, I look at this every single day:


I just didn't realize it was in my studio.

I suppose I should embrace the cute, make some funky things and just roll with it.

Damn cuteness.

26 October 2010

random it up, baby

I'm scattered. Again. Across several different projects all at the same time. Again.

Sometimes I think it would be nice to have nothing to do but then I realize that's just all kinds of crazy talk. I'm not capable of sitting still.

So I have random. Here goes:


1. I've received a few emails asking about the photos I'm using for short story sunday. The question is will I write fragments from other people's photos? The answer is yes, I will. The last one posted was based on a photo taken by Cathy's daughter.

If you have one you want me to use, you can send it along to FibraArtysta@earthlink.net

But I warn you, I write moody. No getting around it.

* * * * * * * * * * * * * * * * * * * * * * * * * * * * * * * * * * * * * * * * * * * * * * *

2. Gisela sent me this photo today:


This is precisely what little man looked like when he was, well, little. Now you see why I was (and still am) powerless when faced with the cuteness.

Dooley love still lays like that, I call it his grizzly bear rug impersonation.

Lately I've been experimenting with different ways to wake him up in the mornings. Getting a nearly twelve year old dog enthused about separating himself from the sofa is no easy business. I had the brilliant idea that I would take his picture.

The thinking behind it is that he doesn't really like the camera (much like his momma) so it would irritate him just enough to get up. Its resulted in I don't know how many photos like this:

That would be his mid-yawn-stretch demonic looking pose.

I think I need a new plan.

* * * * * * * * * * * * * * * * * * * * * * * * * * * * * * * * * * * * * * * * * * * * * * *

3. I'm reading this book. The first line is "This is not for you." Sucked me in immediately. I may never sleep again since its pretty much the creepiest thing I've ever read but hey, it will be worth it.


* * * * * * * * * * * * * * * * * * * * * * * * * * * * * * * * * * * * * * * * * * * * * * *

4. I couldn't resist snapping this photo when I was walking around downtown the other day:


* * * * * * * * * * * * * * * * * * * * * * * * * * * * * * * * * * * * * * * * * * * * * * *

5. I'm in the middle of (another) big purge in the studio. This time not so much about getting rid of things but more about relocating them.

They are the things that I still use but not on a daily basis and I need to reclaim the real estate that they are hogging up. One of the reasons is because I want to hold private thermofax screen printing classes up there. I can only accommodate two students but it would be cool because the machines are there and screens could be made on demand. Not a bad thing.

There was also the issue of the shutters that were just installed over both windows. They are brilliant and beautiful but if I ever want to open my windows again, I can't put the shelves and stands back in front of them because of the way they open inward.

I'm convinced I shall never be done cleaning/organizing/obsessing over that blasted room.


* * * * * * * * * * * * * * * * * * * * * * * * * * * * * * * * * * * * * * * * * * * * * * *

6. Nanowrimo begins in a few days. I dig the badges this year:


This will be my fourth year doing it. I love it, its all kinds of insanity. Mostly I enjoy it because writing an entire novel in a 30 day period pretty much executes your inner editor. (You can actually hear her weep and cringe with every run on sentence and lousy analogy.)

It might sound like an impossibility to write a whole novel in that time but its really not. Once you have an idea, running with it is really very easy. Normally I produce between 250-350 pages during the month and believe it or not, its not all junk. It needs lots of cleaning up but its almost like writing a really detailed, elaborate outline.

I'm going to pry a story out of my head that I've started and stopped several times. Its insistent so its time to be done with it.

* * * * * * * * * * * * * * * * * * * * * * * * * * * * * * * * * * * * * * * * * * * * * * *

The wind is kicking up here something awful. We're supposed to get major storms here, with winds of 50mph. I may have to put ankle weights on the westie if he needs to go out before its over.

I'm heading back up to the studio for more organizing. Where's a house elf when you need one?