30 November 2010

big news, little news & in between news

Its been a whirl wind of activity over here on this end. Its kept me scurrying around like a headless chicken and I've decided that today is my day to park my tush on the sofa and bond with my laptop. (I do love my laptop so. Is that wrong?)

I made a list of things that I want to blog about. Its becoming that hard to keep track - no longer can I just put it in my head and expect it to be there when the time comes that it needs to be tended to. (Not sure if that's a sign of getting older or just the fact that I find it easier to move through life with a schedule akin to a runaway train. I'll have to think on that one...I'll make a note to do that...)

Everything's been pretty exciting around here so let's get to it.

Big news!

I've been sitting on this one for a long time and I'm finally excited to be able to say: TA-DA! I've got another article in the latest issue of Quilting Arts!

I give you two guesses what the topic is (pretty sure you'll only need the one). Yup, thermofax screen printing. I am now bringing my obsession to the masses, I feel a little like Pinky and the Brain. Have a little looky:

Its a whopping five pages long and I am always so darn impressed with the beautiful layouts that QA puts together. They've got such a grand way of making everything looks its absolute best.

Don't forget that I've got tons of screens and paints in my etsy shop so if you are inclined to join me in my mad little world of screen printing, everything is there to initiate you. :)

* * * * * * * * * * * * * * * * *

Semi-big news!


I sold stuff.

Last Saturday was Running with Scissors' 2nd Annual Handmade Marketplace. Here was my set-up:


Business was decent. Its only our second year so we are still working on establishing a following and getting the kinks out. I'm doing another show this coming Saturday called All the Trimmings. Its in Chelsea, MI so if you are inclined to come on by and give me a little hello, I'd be happy to see you.

At the RWS marketplace I sat next to Kate. This is both a wise and dangerous thing. Wise because Kate is about a hundred different kinds of awesome and always fun to be around. Dangerous because as soon as she put these little fellows on her table, I snatched them, growled "They're mine!" like an obsessed banshee and hid them away in my display so no one else could claim them:


I am utterly addicted to her plush piggies. Can't get enough. The one on the right is a mini - a plush piggie piglet! (Say that five times fast!) These two bring my count up to five. Now I can stack them like a cheer leading pyramid, which amuses me to no end. They hang out on top of my thermofax machine so while I fill etsy orders, I can squeeze their chubby little bodies and chuckle.

Love me the plush piggies.

* * * * * * * * * * * * * * * * *

{{ In between news }}


Today was the take down day for the assemblage show Leann, Joan and I had up at the Coffee Bean for the past two months.

My kitchen table now looks like this:


Its like bringing home old friends. I'm glad to see them again. I'm bringing several with me to the show in Chelsea to maybe see if I can get them adopted out to new homes. After that, I'll get them up in the etsy shop.

The exciting news is that as a result of this show, we've been offered two more exhibits. You should see the way our eyes light up at the idea of being able to make more assemblages - bring us the weld bond!

* * * * * * * * * * * * * * * * *

Little news


The thing that gets to be problematic when so much is going on is that (1) I usually can't find the time to make art and (2) domestic duties tend to suffer - which then results in a mess of impressive epic proportion.

Luckily, I have a deadline that forces me to work a small amount of art making into my schedule. I'm part of an online art quilt challenge group called 12 Connected. Every two months we post art quilts that we made based on a challenge word.

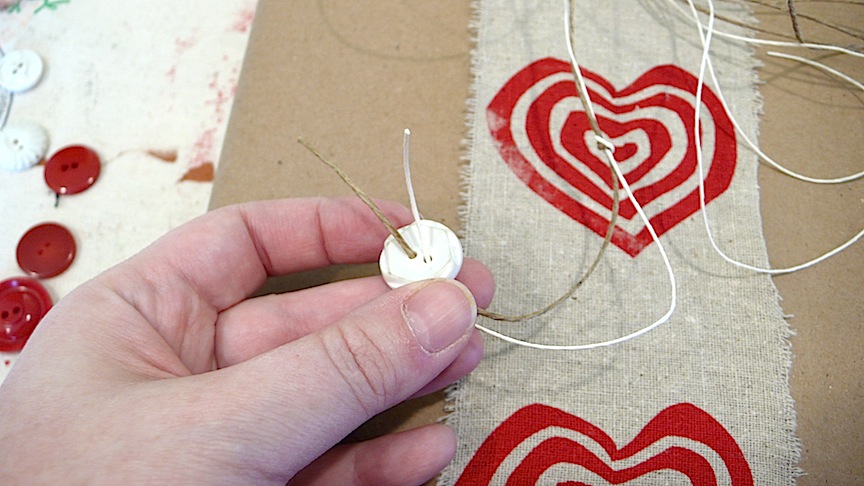
The latest word is Icon. I can't show you my whole piece just yet (it will be posted in detail tomorrow) but here is a little peek:


Layers of thermo printing. Ahhhhhhhhh...does it get any better? Check back here tomorrow for a full view and then I'll kick you on over to the group's blog to see everyone else's work. There is such a wide range of styles, diggin' it.

And yesterday I just couldn't stand it anymore, I had to clean. The first area of attack is my shipping/paint supplies for the shop. Holy cow, they manage to take over and tromp all over my OCD tendencies like you wouldn't believe.

I shifted around things on my bookshelf so I could contain the little devils:


The paint inventory is low. I have a bunch more coming. I have pretty much become one with the paint. While doing laundry yesterday, I found only a few shirts that didn't have some kind of splatter on them. No amount of aproning seems to help and since I'm not about to do screen printing in the nude, I'll have to figure something out.

I also started decorating for Christmas yesterday. My dad got me this:

The whole sleigh rocks back and forth as a music box plays Christmas music. Dr. Seuss definitely has it going on.

Okay, time to go visit my email inbox. Its taking some bravery to get in there and tackle it but I'm tougher then I look. I've got skills...


25 November 2010

thankful


Its that day, isn't it? I sat down last night to make a list of things I'm thankful for to post on the blog and at first, I was a little stumped at how short the list is. I mean, I've got a full life, and a pretty darn good one if I do say so. With all its bumps and curves, its still pretty stellar and I've got no major complaints.

And then I realized that the list doesn't have to be long, it can be short and sweet and still incredibly meaningful.

Here it is:

* family and friends who love me - and who I am incredibly fond of as well

* a creative life and the ability to indulge it to its fullest

* peace of mind and knowing that I am doing what I am meant to be doing


That's an awful lot to be thankful for. I include the blog and all of you in the first one, my life is fuller and richer because of this little place that we get together and visit at.

I hope you all are having a lovely day, little man hopes so too:


Happy Thanksgiving!

23 November 2010

a little parade


I am doing two holiday markets this year, the first one is this coming saturday. I'm a little nervous that despite all my efforts to make sure that I'm drowning in stock (my poor studio is about to stage a protest, its growing weary of the abuse) that I won't have enough for both shows.

I've cleared everything out of my schedule (even going so far as to buy frozen meals from Trader's Joe for the week) so that I can hunker down and work and make sure that there is plenty to go around.

It makes for dreadful blogging. It would be a lot of me waving things at the blog saying "Hey! Look at this!" and "Hey! I took a couple stitches on this! Isn't it thrilling?"

Yeah. Not so much.

So I've been quiet and so has the blog and the whole circle makes me all twitchy. (I do love the blog so.)

In an effort to keep things alive and well here, I decided to do a mini parade of a couple of the things that I'll be selling. The things being shown are getting a little mention here because they have, in one way or another, managed to torture the snot out of me over the past week. In fine fashion, I have turned my studio time into yet another I Love Lucy episode and I figured that in itself is entertainment enough.


Wishing owls:


I made these little guys last year. I love their chubby stumpy little bodies. They are small, about the size of your hand. I've been hauling them around between the sofa and the studio, stitching and fussing over them like you wouldn't believe.

See their adorable little eyeballs? (Click the photo to make it bigger so you can admire them.) They are fabulous in every way humanly possible - except when you accidentally bat them off your work table and watch helplessly as they fling themselves across the room onto some freshly screen printed fabric. (My fault really, I lay things out on the floor to dry. I need a better system...)

The up side? The paint I use truly is water based with easy clean up...


* * * * * * * * * * * * * * * * * * * *

Mini tote bags:


I've been itching to get some tote bags into the shop for a while. I've debated dyeing canvas ones to print or sewing up my own. In the end, I decided to give these charming little fellows a try.

They are 13" square and sport 14" long handles. They are made of simple cotton fabric. They won't be hauling all your groceries or other heavy fare.

But they are friendly and sweet and just the perfect thing to fold up and keep in your purse for when you have something small that needs carrying. They do also work well for smaller scale knitting projects (I've forced myself to test this over the past month. It was a hard task to take on but I endured.)

Since its my habit to lay things out to dry on my studio floor, it became crowded quickly. (I've got 18 printed up and going to the shows. If they get a good response, I'll bring them to the etsy shop.) You see where this is headed, right?

The really impressive part is that I managed to walk across one and not notice it. The paint was not quite dry and tacky enough that it stuck to my sock so I drug it down the hallway before noticing it was there.

Graceful, aren't I?


* * * * * * * * * * * * * * * * * * * *

Crocheted scarves:


I found a really cool vintage ripple scarf pattern and since I have a healthy yarn stash, I decided to put some of it to work.

I knew which yarn I wanted to use. Finding it was another matter. As I couldn't find the yarn I wanted, I employed another kind but could never quite warm up to it. But you know who did like the second choice yarn? The westie.

I came downstairs one afternoon to find little man carrying around a half crocheted scarf in his mouth. He was rather proud of himself as he tripped over it and then proceeded to hack from all the fuzz he managed to inhale.

I guess I should thank him because it forced me to go back into the stash (not a place for the faint of heart) and find the yarn I wanted to use in the first place (which is what the scarves above is made from). Even the westie knew better that the second choice sucked. See? He's looking out for your well being too, I've trained him well.

* * * * * * * * * * * * * * * * * * * *

Assemblages:


You'd think that after this I would have had enough but nope, I can't help myself. And yes, that is screen printing on the background. Honestly? Are you surprised? If I can screen print it, I will. Rock on. :)

Several people have asked me what the obsession with birds and eggs and nests is about. Dunno. Your guess is as good as mine. Truth is I just like them and sometimes that's good enough.

I discovered that my tube of Weldbond glue was nearly empty when I sat down to glue the eggs in. In my effort to see if it was simply clogged or if there was nothing left to be had, I can now offer you this advice: don't point the tube opening at your face while checking. (Glue and glasses don't mix that well. Neither does glue up the nose. Just sayin'.)


* * * * * * * * * * * * * * * * * * * *
Felted bowls:


I dig these. I made some last year too. All things wool make me happy. I decided this year to shape the bowls a little bit differently and add a penny rug detail to the bottom. I still need to stitch the circles, that's my activity after this post is done.

The only real challenge these fellows posed is the fact that wet wool smells like wet dog. A lot. No matter what you do. So the felting process was loads of fun.

I plan to burn a bunch of screens to take along too. Its my personal goal to convert everyone I possibly can to screen printing. Come on, you know you want to...

I have several other items but for the most part, they were behaved. I'll grab a few shots at the marketplace, I'm hoping we have another good turnout like last year. The group worked hard to promote it and there's going to be tons of cool stuff there.

For all the hard work that goes into it, I do have fun making the stuff. I am, however, looking forward to getting back to making some artwork that isn't for anything particular.

But for now? I've got more stock to make, time to get back to work!

21 November 2010

craft tutorial: the art of gift wrapping part 5

Well, here we are, at the end of our art of gift wrapping series. Here's a recap to the other four parts in case you missed them:


the art of gift wrapping part 1: Screen Print Your Own Ribbon!

the art of gift wrapping part 2: Fabric as Gift Wrapping

the art of gift wrapping part 3: Screen Printing Your Own Paper

the art of gift wrapping part 4: Sprucing up Brown Kraft Paper


Part 5 of our art of gift wrapping craft tutorial series takes a look at Easy Decorations for Gift Bags.

I love gift bags. You can cram any kind of odd shaped gift into them and its neatly "wrapped" without giving away what it is.

My mom's birthday is coming up soon. If you have a birthday around the holidays, then you know that sometimes its hard to separate the two celebrations. I think birthdays are special so I like to make sure it stands out.

She loves pink and lace and all things girly so I made sure to indulge her likes in making this:

front and back view of stuffed heart


* * * * * * * * * * * * * * * *

Step 1

I used a brown kraft bag for this. You can use any paper bag you like but steer clear of the ones that have a shiny surface, the paint doesn't stick real well to those.

I chose the daisy doodles screen and the cosmopolitan pink paint from the shop:


We talked a little bit about using Simply Screen on paper in Part 4 of the series. The textile medium in it can sometimes leave a tacky feel when you use it on paper. I decided to give it a shot here since I wanted the metallic pink color.

It did stay a little bit tacky but it was minimal, not enough to make me want to ditch it altogether. So I chose the color over a perfect print for this project. Whether or not you can live with it is up to you, there are many other paint options for printing on paper.


* * * * * * * * * * * * * * * *

Step 2

Gift bags are not nice and flat like fabric or a sheet of paper. They have some bulk to them that can cause them to spring back when you are trying to print on them. This can cause your print to come out blurry - boo!

But there's a real easy solution. Put the screen on your bag where you want to print it and then weight the corners of it down so there is less spring in the bag:


Go ahead and print your image:


Set your bag aside to dry while we make the tag for it.

* * * * * * * * * * * * * * * *

Step 3

One of the things I like best about gift bags is that you can hang things from the handles. I like lots of danglies on bags. :)

I decided to make a unique tag for the bag (since its for my mom and all) - a little plushie heart.

Back before Halloween I did a tutorial on making a screen printed plushie skeleton. I used the same process for making the heart here. I'll touch on some of the steps for this tutorial but if you want to see every step in detail, be sure to go and check out that post.

I started making my plushie heart by using the nested heart screen and printing it on some osnaburg fabric:


I printed up a whole bunch while I was at it so I can make some little plushie ornaments for the Christmas tree. The process for that would be the same, just don't tie it onto a bag. :)


* * * * * * * * * * * * * * * *

Step 4

Put right sides together and give your heart a little sew on the machine:


I like to sew around completely and then cut a slit in the back for turning and stuffing. (I show all this in the skeleton plushie tutorial.) But you can leave an opening in the edge if you prefer and turn / stuff it that way.

I stuffed the little cutie lightly, I wanted it to hang nice. I thought that if I stuffed it a lot then it would sticking off the side of the bag like a wild thing trying to flee so I went for slightly understuffed this time.

I also cut a rectangle from the same piece of fabric I printed the heart on. I used perle 5 embroidery thread for stitching on the label and making the hanger. Since we are doing a few things with the thread, make sure its a fairly long piece.

Here we are with the heart turned and stuffed and ready for me to stitch the slit on the back shut:


If you do this step, don't cut the thread once you are done with this part.


* * * * * * * * * * * * * * * *

Step 5

Since I need a label to cover up the slit in the back that I stitched shut, I decided it would be a good opportunity to personalize the heart for the occasion. (You can do a label even if you don't need one. If you plan to leave an opening for turning/stuffing along the seam, you could even write your message before sewing.)

I like Identipen markers, they work great on fabric and are permanent:


I gave my label a little trim to make it fit on the heart nicer:


Since we didn't cut the embroidery thread after stitching the slit hole in the last step, we can just continue on with it for attaching the label. Whip stitch around the edges to attach it. I started stitching at the bottom, middle edge of the label. This will come in handy in a moment. Stitch all the way around it:


* * * * * * * * * * * * * * * *

Step 6

When you are done stitching down your label, don't cut your thread!


Squish the heart a little bit so you can run the needle up underneath the label and out the top of the heart:


* * * * * * * * * * * * * * * *

Step 7

Take the thread out of the needle and tie a couple of knots to hold it in place:


* * * * * * * * * * * * * * * *

Step 8

Tie your stuffed heart onto the bag:


CUTE! :)

* * * * * * * * * * * * * * * *

Step 9

I think the bag looks pretty darn adorable with the screen printing and heart but knowing my mom and how much she loves lace, I took it one step farther and decided to add some on.

I cut a strip of lace and put a few dabs of tacky glue on the back:


And laid it across the bag to dry:


And there you have it!


A very girly gift bag full of personal touches!

I had a lot of fun writing these tutorials - hope you enjoyed them too. :)

I've got tons of other projects in the works right now so the blog will be going back to a mixture of tutorials and regular posts.

Happy Printing!


19 November 2010

craft tutorial: the art of gift wrapping part 4

And so we continue with our obsession about gift wrapping. :)

Part 4 of our art of gift wrapping craft tutorial series focuses on using humble brown kraft paper.

Brown kraft paper is one of the ultimate budget saving ways to go when it comes to wrapping. I picked up a roll of it at the dollar store. I really like the natural look of it but let's be honest, it does need some sprucing up.

There are a couple of ways you can go about it. One way is to use Part 3 of our series and do some screen printing on it. Or you can do what I do - leave it as is and dress it up with some creative ribbon making!


If you missed Part 1 of the series where we screen printed our own fabric ribbon, go on back and take a look through it. We'll be using some of that ribbon here to give our package a fun look! :)


* * * * * * * * * * * * * * * *

Step 1

Wrap your box in brown kraft paper and choose a screen printed ribbon to go with it. I choose a ribbon that I made from osnaburg fabric (a very natural looking fabric found near the muslin in the fabric store) and printed with the nested heart screen.

I wrapped the ribbon around the package length wise so that I could get more repeats of the heart to show up:


We talked about different ways to secure the ribbon in Part 2 of the series when we wrapped our package in fabric but here's a recap:

1. You can stitch the ends together like this:


OR

2. Run a line of fabric glue along the edge (just a bit) and let it dry.


* * * * * * * * * * * * * * * *

Step 2

Since we are pretty much focusing on using ribbon to make our package look unique, we'll need to decide what we want to do next. Here are some ideas:

1. Use the same ribbon with the hearts on it, nothing wrong with this option! It is very cute after all! :)

2. Use a different color ribbon, one that isn't printed so add a strong punch of color.

3. Create a specialty ribbon that contrasts with the fabric one we've already added.

I went with choice #3. I decided I wanted a little bit of variety added into the mix so I dug around through my stash and pulled out some white and brown paper string and some red and white buttons:


If you don't have string like I used, embroidery thread or leftover yarn from your yarny projects are a great option too! Just look around the house to see what you have, if you're a crafter the odds are you've got plenty to work from - I know I do! :)


* * * * * * * * * * * * * * * *

Step 3

I liked using string that was the same color as the kraft paper but I wanted to make sure it stood out. So that's why I decided to add some white string in with it too.

Wrap the string around your package and leave long tails so you can easily tie your buttons on (we'll show that in a moment).

I cut three brown and three white so I'd have string flying about everywhere, might as well make it a party! Tie your string in place with two knots:


* * * * * * * * * * * * * * * *

Step 4

I chose buttons with two holes in it to make things easier for this step. If you have four hole buttons, you can still use those, just tie them to the string through only two holes.

Begin by tying a knot in one brown and one white string held together:


This will determine how far down the string the button will sit, its a stopper. So if you want your button to sit closer the center of the package, tie the knot near the center. Its all a personal preference.

I wanted a floppy, wilder look so I tied mine more toward the end of the string.


* * * * * * * * * * * * * * * *

Step 5

Slide your button onto the string. Feed the brown string through one hole and the white string through another:


If you are using embroidery thread or yarn instead of string, you may want to thread it onto a needle first just to make this step easier.


* * * * * * * * * * * * * * * *

Step 6

Tie a simple overhand knot to keep the button in place. (I tied mine twice just to make sure the little buggers stayed on):


* * * * * * * * * * * * * * * *

Step 7

Repeat Step 6 until you've tied on all the buttons:


Pretty cute, huh? :)

One of the reasons I really like this package is because it says, "I'm handmade and proud of it!" Its easy, hardly takes any time at all and really stands out from the usual commercial packaging.

That wraps up (no pun intended!) Part 4 of the series. We'll finish up the series on Sunday with Part 5: Easy Decorations for Gift Bags.

I've had such a fun time putting this all together - I hope you are enjoying it too!

If you've missed any part of the series, here are some quick links back to the first three parts of it:

the art of gift wrapping part 1: Screen Print Your Own Ribbon!

the art of gift wrapping part 2: Fabric as Gift Wrapping

the art of gift wrapping part 3: Screen Printing Your Own Paper

And if you're looking for screens and paint to create your own wrapping, you can find everything you need in my etsy shop and instructional videos on my YouTube channel. I've got you covered! :)

18 November 2010

craft tutorial: the art of gift wrapping part 3

Putting these craft tutorials together takes some concentrated quiet time - something that's been in short supply the past couple of days - so I needed to hold off a couple of days. But we are back at it and ready to go!

The last installment of this tutorial, Fabric as Gift Wrapping, was the second in this five part series.

So Part 3 of our art of gift wrapping craft tutorial series is about screen printing your own gift wrapping.

The tutorial will walk us through making this:


Now here are a couple of quick things to think about:

1. Even though this tutorial talks about screening on paper, you can easily apply this to fabric too.

2. The package above doesn't look very holiday-ish, does it? That was intentional, gift wrapping happens alllll year round so this can apply to birthdays, anniversaries, baby showers or just because gifties! Feel free to adapt the imagery to the holiday season, let your imagination run wild! :)


One of the things I'd like to talk a bit about is what kind of paint to use when screen printing on paper. I don't mention that a lot here since I am a total fabric addict but there are some things to think about.

Take a look at these fellows:


There is a separate family of screen printing inks formulated for paper. Shown above is Versatex ink, Speedball water soluble ink, Jacquard pro ink and golden silkscreen medium. Let's have a quick chat about each one:

1. Versatex is advertised as being used on fabric and paper. Its a very thick paint. You'll want to screen print the traditional way with a squeegee or scraper rather then my favorite method which is with a sponge brush. Because it can be used on both, I still find it has a stickiness on paper that sometimes bugs me. (Check out my video tutorials for a refresher on Basic Printing and Repeat Printing.)

2. Speedball works great on paper. No complaints.

3. Jacquard Professional Inks are again quite thick and need to be printed the traditional way. They have astounding opacity. They are advertised as being able to stick to every surface. (Which tempts me to drag a jar of it around with me randomly screen printing things to see if its true but that's a whole different post.) They work great on paper as well.

4. Golden's silkscreen medium is one of my favorite products. I just looked back through the blog and can't believe I've never mentioned it before! Since its just a medium, you can use it with any acrylic paint that you own. Doesn't have to be Golden brand (although they are my favorites). Just mix the paint in with the medium and you've got instant screen printing paint! (Read about why you want to use it here.)

I like to put a couple of spoonfuls of medium in a cup and then a few drops of paint until I get the intensity of color I like. Its not very scientific, I know, but once you use it a couple of times and get a feel for it, you'll be a pro at mixing it to your preference.

**Its important to note that Golden has two mediums for silk screening. One is the the one discussed above but it is NOT meant for fabric. You'll need the silk screening gel for that. Works just as well, but has textile medium so it will make your fabric happier.

For this tutorial I used Golden's silkscreen medium and two colors of their fluid acrylics to print on paper.

Can you use the paint I sell to screen on paper? Technically, yes. But the thing about it is that its meant to go on textiles. Which means it has textile medium in it, an additive that helps keep it flexible so it won't crack and turn your fabric to stone.

That same textile medium can leave prints on paper tacky. And some papers just plain don't like it, making your print look like you had to club the paper upside the head to convince it to let you do it (ask me how I know).

I guess my point is that if you want to use textile paint to screen on paper, you can. But results are mixed and you might be unhappy with the results. To get good results, you'd be better off using a paint that is intended to be used on paper.

Now that we have all that out of the way, let's get to screening our own wrapping paper! :)


* * * * * * * * * * * * * * * *

Step 1

I used white craft paper that comes on a roll. I bought at Joann's (its in the kids craft section) with a 40% off coupon. You could also use fabric or brown kraft paper. Doesn't matter what you use, directions will be the same (except make sure you use textile screen printing paint if you go the fabric route).

I prefer to print the paper for individual packages. I don't have a lot of space so printing big long sections is difficult. But if you do have the room, go for it!

For an individual package, begin by wrapping the paper around your box and cut it to size so you know how much you will need.


* * * * * * * * * * * * * * * *

Step 2

Decide what images you would like to print. Here are some ideas:

1. Print the same image but in different colors to add some variety.

2. Choose two or three different images and alternate them as you print across the paper.

3. Choose the same image in two different sizes and print them in different colors.

I chose option number 3. The screens I chose are birds on a wire (large) and birds on a wire (mini). (I'm obsessed with this design.)

When I print on paper I like to let the first color dry and then move on to the second. I know I go at fabric full force (not waiting for layers to dry) but for whatever reason, I get cleaner results when I print on paper if I allow one layer to dry first.

Print layer 1:


Let it dry:


Print layer 2:


And let that dry too:


I just printed randomly, left a lot of white space. Feel free to print more densely if you like. I just liked the graphic look this gave, negative space can really give a design a modern feel.


* * * * * * * * * * * * * * * *

Step 3

Once your prints are dry, give your package a wrap:


I decided to add some more elements with a good old sharpie:


Just random lines along the wire the birds are sitting on to add an extra punch of color.

I did this after I wrapped the package but in hindsight, this would have been easier to do before I had wrapped it. Doodling across the paper after printing will add more of a personal touch as well as a whole new layer of design to your package.

Keep it simple like I did or go completely nuts and cover every inch!

* * * * * * * * * * * * * * * *

Step 4

How do you like the giant empty white space right smack on the front of the package? No need to fret, its just another design opportunity.

You could:

1. Screen another print across that space (be sure that your paper is thick enough that the paint won't bleed through).

2. Add a gift tag to that space.

I thought the tag was a fun idea so I went with that:


I do a lot of art journaling (which thermofax screens are awesome in, by the way!) so I grabbed my 2.75" diameter circle punch and some markers and decided to do a free hand tag.

* * * * * * * * * * * * * * * *

Step 4

And this is the result:


I couldn't stop there (if I could add striped borders to everything on the planet, I would - totally obsessed with them). So I did one more border with a black sharpie around the tag directly on the craft paper:


Its a little crooked and wonky but I like it.

And there you have it: a gift wrapped in screen printed package, decorated with sharpies and a hand doodled tag.


This is a great project to do with kids too. It really personalizes things - and that's the best part! :)

Part 4 of our art of gift wrapping series will be posted tomorrow. We'll cover using humble brown kraft paper as wrapping and ways to pump it up!

If you missed the first two parts, you can find them here:

the art of gift wrapping part 1: Screen Print Your Own Ribbon!

the art of gift wrapping part 2: Fabric as Gift Wrapping

Enjoy!