31 October 2010

printed project sunday - guest blogger jackie lams

When I taught my Basic Screen Printing using Thermofax Screens class a couple of weeks ago, a good question came up: can you dye screen printed fabric/projects?

Its not something I've tried yet and when I said I wasn't sure, Jackie immediately piped up and said, "Want me to try it???" (And yes, she was giddy about it. The girl loves a challenge.)

I said sure and asked if she would like to do a guest blog post for Printed Project Sunday. Which brings us to this post.

So without further ado, Jackie answers the question: "Can you overdye screen printing?"


* * * * * * * * * * * * * * * * * * * * * * *

*Text and photos are courtesy of Jackie.


A few weeks ago at Lynn's Thermofax workshop at the Northville Art House, Lynn mentioned that she had not dye tested the Plaid Simply Screen Paint. Since I have been looking for a good excuse to break out the dye supplies, I promptly volunteered to test out the product for her. I have a large tote bag from Dharma Trading Company that has been waiting for a surface treatment and fabric dye opportunity such as this.


For this test I used Dylon Fabric Dye. It's cheap, quick and easy. There is a decent array of colors to choose from and the supply list is much smaller than supplies for MX Pro dyes. (*Note from Lynn: Dylon dyes come from the UK. You can find them at Joann Fabrics, Michaels and Hobby Lobby. The fixative for these dyes is already included in the packet so all you need to do is add salt to the solution and you are good to go.)

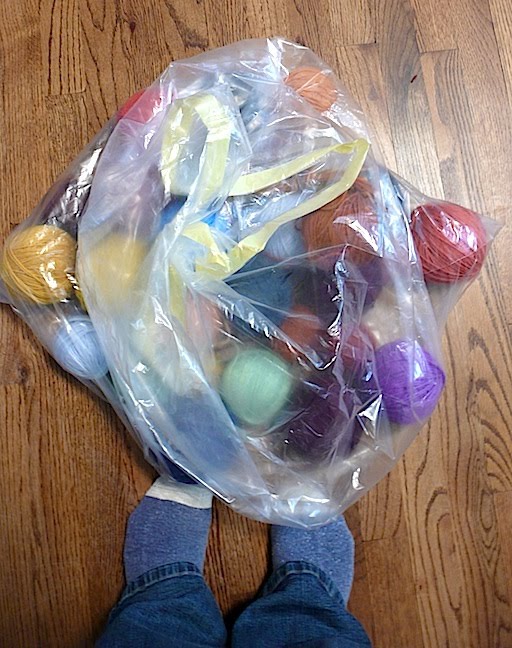
Don't worry, I'll be testing with MX Pro (Procion) dyes very soon. So first step is to screen print the fabric you wish to dye. I used French Roast brown and a lovely Pond Scum metallic green. The screens are from Lynn's Etsy shop. The ones I used are Threadbare and Bubbles. Let the paint dry completely. Here's the bag all printed and before the Dylon bath:


Make sure you heat set your printed fabric thoroughly before you dye it. I ironed the bag's printed surfaces with my iron set on lava hot. Then, just because I am overly cautious sometimes, I put the bag in the dryer on high for ten minutes. Just to make sure everything was set.

Next I gathered up a five gallon bucket (that I use just for dye), a big mixing spoon (also not used for anything but dye), one smaller plastic container to mix the dye, warm water and salt together, and an apron for myself. Then I followed the directions on the package. If you've done Procion dye work before, you will love the short list of steps to follow for Dylon. I submerged the damp bag into the five gallon bucket.

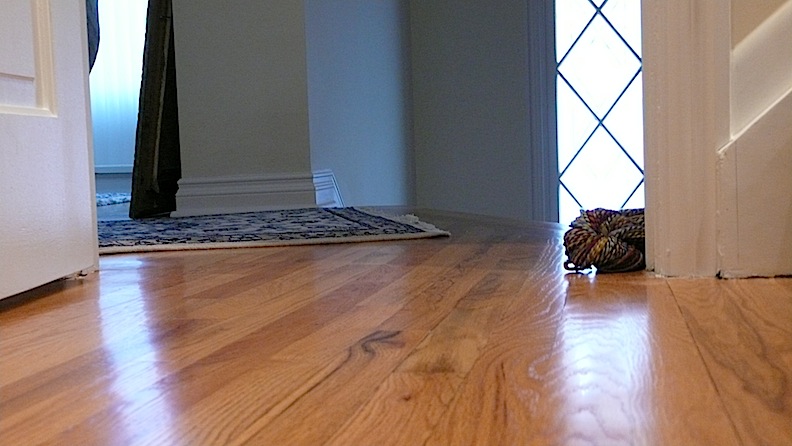
Here it is soaking in a warm, brown bath:


The paint did appear to morph a little while dyeing but it didn't stay that way. So I stirred the bag and moved it around to make sure everything got exposed to the dye. I watched the clock and stirred some more. When time was up, I removed the bag and squeezed some of the excess dye out of it. Then I chucked it into the washing machine and put it through a cold rinse cycle.

I then washed it in a complete cycle with some Synthrapol. I checked the water at the rinse cycle to see how much dye was coming out and found it pretty clean. I allowed the bag to air dry overnight and then finally ironed it out several days later.


It came out pretty good! The paint held up perfectly! I will probably do more surface design on the bag over the winter months but for now, this will do just fine.

Next round I'll heat things up with some MX Pro dye and a mircowave!


* * * * * * * * * * * * * * * * * * * * * * *

Thanks so much Jackie! The bag looks awesome - hope you all enjoyed this tutorial as much as I did!


Printed Project Sunday highlights artwork that features hand printed fabric or paper. The methods vary from traditional screen printing, deconstructed screen printing, thermofax screen printing, monoprinting, gelatin plate printing - anything you can think of!

They will also include tutorials and various projects featuring thermofax screen printing (I'm an addict, what can I say?)

If you would like to have your work featured on the blog, send an image and explanation of your work to FibraArtysta@earthlink.net
All work, images and text are copyright of the contributing artists and are posted with permission.

29 October 2010

different versions of cute


Its no secret that my artwork and writing tend to lean toward the moody side. There was a time when I tried to change that, make it more upbeat and what I thought people would like. I found that I got a poor response to that work, probably because it wasn't authentic and it showed in every stitch.

So I went back to whatever struck me when I happened to be working and there has been a consistent level of seriousness to what I make. Not all of it has a deep meaning, not all of it is tragic but I think its safe to say that I don't do cute.

But as I continued to work on my studio reorg (again), I realized something strange.

Perhaps I do do cute. I have to say that it was a little bit of a shock. But the proof is evident, I can't get around it.

For a while I've found myself picking up random pieces of commercial prints. Those mod retro ones and plaids (I blame it on having to wear a catholic school girl uniform for twelve years) are my ultimate weakness. Its resulted in plies like these:


I knew the fabric was there (I bought it after all) but I didn't realize how much of it was there. Its been a while since I've had a good reorg of the fabric stash.

All I could think was, "I seem to like cute."

I will say that I have a particular way that I like to use these fabrics. I like to make plushies like these wishing owls that are still waiting for faces and pockets:


There has to be a certain level of quirkiness or weirdness for me to accept its cuteness. Like these piggy plushies I just got from Kate. You can't help but squeeze them every time you walk by them. See? Totally quirky cute.

It doesn't seem to stop at the fabric, though. The cute spilled over into this as well:


I needed eyes for my wishing owls and didn't have any interesting buttons in my stash. So I went button shopping.

And they are? Come on, say it with me: c-u-t-e.

I don't know why I find this amount of cuteness so surprising. After all, I look at this every single day:


I just didn't realize it was in my studio.

I suppose I should embrace the cute, make some funky things and just roll with it.

Damn cuteness.

26 October 2010

random it up, baby

I'm scattered. Again. Across several different projects all at the same time. Again.

Sometimes I think it would be nice to have nothing to do but then I realize that's just all kinds of crazy talk. I'm not capable of sitting still.

So I have random. Here goes:


1. I've received a few emails asking about the photos I'm using for short story sunday. The question is will I write fragments from other people's photos? The answer is yes, I will. The last one posted was based on a photo taken by Cathy's daughter.

If you have one you want me to use, you can send it along to FibraArtysta@earthlink.net

But I warn you, I write moody. No getting around it.

* * * * * * * * * * * * * * * * * * * * * * * * * * * * * * * * * * * * * * * * * * * * * * *

2. Gisela sent me this photo today:


This is precisely what little man looked like when he was, well, little. Now you see why I was (and still am) powerless when faced with the cuteness.

Dooley love still lays like that, I call it his grizzly bear rug impersonation.

Lately I've been experimenting with different ways to wake him up in the mornings. Getting a nearly twelve year old dog enthused about separating himself from the sofa is no easy business. I had the brilliant idea that I would take his picture.

The thinking behind it is that he doesn't really like the camera (much like his momma) so it would irritate him just enough to get up. Its resulted in I don't know how many photos like this:

That would be his mid-yawn-stretch demonic looking pose.

I think I need a new plan.

* * * * * * * * * * * * * * * * * * * * * * * * * * * * * * * * * * * * * * * * * * * * * * *

3. I'm reading this book. The first line is "This is not for you." Sucked me in immediately. I may never sleep again since its pretty much the creepiest thing I've ever read but hey, it will be worth it.


* * * * * * * * * * * * * * * * * * * * * * * * * * * * * * * * * * * * * * * * * * * * * * *

4. I couldn't resist snapping this photo when I was walking around downtown the other day:


* * * * * * * * * * * * * * * * * * * * * * * * * * * * * * * * * * * * * * * * * * * * * * *

5. I'm in the middle of (another) big purge in the studio. This time not so much about getting rid of things but more about relocating them.

They are the things that I still use but not on a daily basis and I need to reclaim the real estate that they are hogging up. One of the reasons is because I want to hold private thermofax screen printing classes up there. I can only accommodate two students but it would be cool because the machines are there and screens could be made on demand. Not a bad thing.

There was also the issue of the shutters that were just installed over both windows. They are brilliant and beautiful but if I ever want to open my windows again, I can't put the shelves and stands back in front of them because of the way they open inward.

I'm convinced I shall never be done cleaning/organizing/obsessing over that blasted room.


* * * * * * * * * * * * * * * * * * * * * * * * * * * * * * * * * * * * * * * * * * * * * * *

6. Nanowrimo begins in a few days. I dig the badges this year:


This will be my fourth year doing it. I love it, its all kinds of insanity. Mostly I enjoy it because writing an entire novel in a 30 day period pretty much executes your inner editor. (You can actually hear her weep and cringe with every run on sentence and lousy analogy.)

It might sound like an impossibility to write a whole novel in that time but its really not. Once you have an idea, running with it is really very easy. Normally I produce between 250-350 pages during the month and believe it or not, its not all junk. It needs lots of cleaning up but its almost like writing a really detailed, elaborate outline.

I'm going to pry a story out of my head that I've started and stopped several times. Its insistent so its time to be done with it.

* * * * * * * * * * * * * * * * * * * * * * * * * * * * * * * * * * * * * * * * * * * * * * *

The wind is kicking up here something awful. We're supposed to get major storms here, with winds of 50mph. I may have to put ankle weights on the westie if he needs to go out before its over.

I'm heading back up to the studio for more organizing. Where's a house elf when you need one?

24 October 2010

short story sunday


The sun felt heavy, weighted. She tipped over on her side, feeling the grass struggle against her weight. Margaret always lined herself up with the opening in the fence. It seemed more logical that way. She imagined that if a camera looked down at her from above, her placement in the grass would appear as a neat piece of a grid. The idea of it satisfied.

She reached out her hand and pressed it between the blades of green. The scar that stretched sleepily across her palm looked nearly transparent in the daylight. Sometimes it felt like it itched but she knew that wasn't possible. Still, when her mind traveled back to that day the skin around it tightened and she would rub it mindlessly.

She shut her eyes and rolled onto her back, letting the day color the insides of her eyelids a rosy pink orange. And she waited.

Margaret waited. For that moment that she was promised. In the meantime this field would do, she thought as she drifted off into a mid day dream.


Short Story Sunday is a series of mini stories based on random photos. They are quick, spontaneous flashes of abstract fiction.

22 October 2010

skelly winners!

Today is the day.

Skelly plushie winners have been selected for the skelly seeks a new home giveaway. Cathy is here visiting for the weekend and I enslaved her by forcing her to write down everyone's name who left a comment on a slip of paper and then drawing three names at random. (I know I could have use the Random Number Generator online but this was far more fun to make her do it.)

So without further ado, here are the winners!

Kim Hambric
Karen Newman Fridy
Merrie Jo

Congrats ladies! All you need to do now is send me a private email at FibraArtysta@earthlink.net with your color choice (see the photo below) and your snail mail address. I'll get the little buggers in the mail next week.


Many people have asked how I managed to get this biker to hold a pink skelly plushie:


So here's the story.

When we scheduled our Meet the Artists Afternoon for our no assembly required exhibit, we were smart enough to check the coffee shop's schedule to make sure we didn't interfere with any events they might be holding.

We did not, however, think to check the city's schedule. Murphy's law could not resist. It really was too good of an opportunity to pass up. We made the postcards, put the date down on 250 pieces of heavy cardstock and then found out that that was the same weekend as Plymouth's Chili Cookoff.

That alone doesn't sound like enough to turn the city into a mob scene but this seemed to do the trick:


A motorcycle show runs alongside the chili cook off and I'm pretty confident that every motorcycle in Michigan was crammed into the little downtown area. The bikes were everywhere, it was way cool.


I loved the furry little companion in this guy's sidecar:


I wish I had gotten a better shot but they were driving in front of me and I had to snap a shot when traffic was stopped. It was a beagle that felt the need to bark loud and proud all the way up Harvey street. He was having a good time.

I made the comment that it would be cool to find a biker to hold a skeleton. Someone suggested I just put one on a bike and snap a shot but I know better, you don't mess with motorcycles.

So Jackie and I struck out. We didn't go far before we spotted the gentleman in the photo above. Jackie got a shot of me asking him to hold one, I don't think he quite knew what to think at first:


But after he agreed, I asked him what color and he said "Give me the pink one, it needs to be toughened up."

So there you have it. The tale of the biker and the pink skelly plushie.

Oh and by the way? The biker does not come with the giveaway. Sorry guys...

21 October 2010

its watching...

I realize that there are very few skeins of yarn on this planet that I do not love. Even if I don't buy it, I will pet it and coo over it and give it a little bit of baby talk to build its confidence (I don't want it to feel bad if its not coming home with me).

I have a healthy stash. I make no apologies about that. But lately I've noticed that the yarn is getting a little bit to comfy in my abode. Its small subtle things but I'm starting to feel intimidated by the little wooly beasts...

For example, the current scarf I'm crocheting refused to share the coasters with my coffee cup this morning:


I found a shawl that I'm knitting sunbathing in the morning light:


A bag full of random colors charged me when I walked into the spare room, demanding attention:


A different shawl decided to play with one of Dooley love's toys (notice the death grip the circular needle has on the poor plushie):


And then there is this little prima donna lace skein. I've been hesitant to knit with it because its so darn pretty so I usually just pet it. Apparently its decided it needs a special throne and has taken up residence in the milk glass Cathy gave me for my birthday:


I'm not real sure what to do about it. I mean, I love yarn. Its the comfort food of my fiber world. I get all zen like when I use it and its bonus points that I end up with something that I can use or give as a gift.

But this kind of behavior really can't be tolerated, just look at the plotting:


Perhaps I should threaten it with a trip through the washing machine on the hot cycle...

19 October 2010

fellow thermofax artist interview

I've been hunkered down behind my computer for the past day and a half working on my first newsletter.

I've been tweaking things and adding photos and links until I just can't see straight anymore. One of the features of the newsletter is to introduce everyone who subscribes to it to a fellow thermofax screen artist.

These artists use thermofax screen printing prominently in their work. And I have to say, they make some pretty awesome stuff.

The interview in its entirety will be posted here on the blog three days before the newsletter is sent out to subscribers. Now I have a blog, a website, a facebook page, a facebook fan page and pretty much every available social media page I can keep up with.

And if you're here reading this then you already pay attention. Why bother subscribing to my newsletter as well? Because it includes coupons for the shop and tips and tricks for printing with thermofax screens that won't be posted anywhere else.

Interested? Then sign up here (please excuse the vast amount of spacing, the form got touchy and wouldn't let me add it any other way):


Fibra Artysta's Thermofax Screen Printing Newsletter
* indicates required


I'm excited to say that the very first interview is with the talented Virginia Spiegel. Enjoy the interview and don't forget to sign up for the newsletter!

**********************************************************************************

Q: How did you discover thermofax screens?

Virginia : The Director of the art center in my little town in Nebraska had a collection of Thermofax machines as her Dad had worked in a public school who had discarded all their machines. She gifted one to me - nirvana!


Q: How long have you been using them?

Virginia : About ten years now.


Q: Do you only print fabric with them or do you use them on other surfaces?

Virginia : I mainly print fabric, including velvet, but I also print paper of all kinds, including archival tissue paper and rice paper.


Q: What is your favorite thing about using thermofax screens?

Virginia : They can be extremely detailed.

Once by Virginia Spiegel


Q: What's the weirdest thing you've screenprinted?

Virginia : Birch bark - not an experiment I would repeat.


Q: Would you say that using thermofax screens has added anything special to your artwork or changed the way you work?

Virginia : I am always thinking when I take photographs about what might make a good screen. Because I use my own photographs, drawings, or writings to make screens, screen printing adds another layer of "me" to all my artwork. I depend on screen printing to make the fabric I paint as my raw material in my art quilts something that appeals to me, and I would hope my patrons, on my many levels.


Q: Do you have any tips that you'd like to share?

Virginia : Don't feel as though you need to print the entire screen or that every print has to be perfect. It's the serendipitous and imperfect prints that I especially like.


Then and Now by Virginia Spiegel


Please visit Virginia's blog here.

And check out Virginia's book, Wild at the Edges: Inspiration from a Creative Life.

18 October 2010

new class date at Nonpareil!

Jackie Lams at Northville Art House class


I'm really excited to announce a new class I'm teaching!

Please come join me at Nonpareil in Ann Arbor on November 6 from 10:30am-4pm.

Nonpareil is a new shop by the incredibly talented garment creator Michelle Moenssen. I'm incredibly honored to be teaching there and I do hope you will join me!

The class is Basic Screen Printing using Thermofax Screens. As it is an extended amount of time (usually the class is 3 hours and this one will be 5 hours), there will be plenty of time to work on projects. I'll also be doing a demo on printing t-shirts, printing on paper and composing art cloth.

So here's all the info and I'd love it if you would join me!

******************************************************************

When: Saturday November 6, 2010
Time: 10:30am - 4pm (there will be a 1/2 hour break for lunch)
Where: Nonpareil
Cost: $80 (includes one screen & one bottle of paint of your choice)

Register for class by contacting Nonpareil at 734-327-1837.

Class description: Learn four basic screen printing techniques that you can use to apply to your own projects. The class will cover solid printing, scuff printing (produces ghost images), clean repeat printing and multiple color printing. Students will have access to Lynn's extensive stash of screens to experiment with during class, and students will leave with a screen and bottle of paint. (Please visit Lynn's etsy shop PRIOR to class to choose your screen & paint color so she can have what you want. Screens cannot be made on site.)

As this class allows for extended work time, there will be tutorials on printing t-shirts, printing on paper and composition of art cloth.

Supply list: 100% cotton fabric (4-6 yards - bring fabric that has color and prints, white fabric is fun but color fabric gives more exciting results!), any projects you'd like to print on (t-shirts, tote bags, heavy weight paper, etc.), garbage bag to cover the table and 1" or 1.5" wide sponge brushes (10-12)

**************************************************************************

Hope to see you there! And if you are interested in scheduling a class with me, please give a holler, I'd love to join you! :)

17 October 2010

where i stand sunday


Its that odd kind of perforated contrast between the cold temperatures and sunlight. The light comes in at a heavier angle, casting dusk shadows even in the first half of the day. Its the weight of the year closing down, a drowsiness marked by brilliant color and restless breezes.


Where I Stand is an ongoing photo essay examining the different places I spend my life standing. Too often we take for granted the everyday places we spend our lives walking on. The ground we tread on has its own stories to tell. (The project is now in Year Three. Year One and Year Two can be found here.)

little man in action

I still plan to do my regular sunday post but I've been goofing around with the video camera on my new ipod and felt the need to do the super geeky thing of posting a badly filmed video of little man.

I've been quite happy with my 2nd gen ipod touch for a long time. I always said I wouldn't upgrade unless they put a camera in a new version.

And they did.

So I did.

But they did one better and put in video capability as well. I've found that Dooley does not flee from the ipod so I'm able to take photos of him easier (he hates my camera). I wondered about the video camera too.

He wasn't quite sure what to make of it. But you can see his cuteness in all his glory. I post photos of him constantly and thought it might be nice to prove that he is indeed real and not a robot (as Leann once suggested).

I must put up a disclaimer, though. I talk several octaves higher and in a little bit of baby talk when I speak to him. (He is my baby after all.) I know I'm not alone on this but I felt the need to warn you.

Without further ado, I show you little main in action:


little man bouncing around from Lynn Krawczyk on Vimeo.

13 October 2010

skelly seeks new home giveaway

I have stuffed screened skellys overtaking my studio. They are mischievous when they travel in packs. I went in there yesterday and found all of my scissors strung together like garland stretching across the room. Of course, since they are short it was only raised off the floor about eight inches.

I came to the realization that I need to get some of them new homes (help spread the terror) and since Halloween is just around the corner, it seemed like a good time to do it.

(This biker was able to tame the pink one.)

So here's the deal. Leave me a comment on this blog post (with a way to get in touch with you, if I can't email you to get your mailing info, I won't include you in the drawing. And no anonymous comments.) to get a chance to win not one, not two but three skellies!

Since they have a fiesty pack mentality, three skellies aren't going to one person - three people have a chance to win! You can choose your own color too.

The winners will be chosen on Friday October 22, 2010 by random pull out of the hat kind of drawing.

(from left to right: light pink, blue, green, purple, yellow, white.
See my etsy store for better photos of the colors.)


Please, take them away. I found them doing this on Sunday during my art opening:


So leave a comment and get a chance to win your own skelly!

12 October 2010

guest blogger at Subversive Stitchers blog


I'm very honored to be a guest blogger again over at the fabulous Dawn Goldsmith's blog, Subversive Stitchers.

Please stop by and check it out!

10 October 2010

printed project sunday - skelly plushie tutorial

I love plushies. I love screen printing. And I L-O-V-E Halloween. (When I rule the world, it shall be Halloween every day. Like Groundhog Day, only a constant stream of sugar OD and people dressed up strangely in bizarre costumes. Sounds fun, doesn't it?)

I pondered, especially since today's post is supposed to be a Printed Project Sunday post. I thought that maybe it would be fun to combine my three loves and this sunday post into a craft tutorial project.

Without further ado, I bring you the skelly plushie (and the directions on how to make your very own):


This plushie is made using the skelly duo screen designed by Leann Meixner. I split the design into two individual skellies. I experimented with printing them when they were on the same screen and it was bit torturous so I thought I'd make it easier on all of us.

And if you aren't inclined to make one of your own, head on over to my etsy shop and pick one of them up all ready to go!

Before we get started, let me get the business end of this out of the way. These are fun to make. Give them for gifts for halloween instead of candy (gift giving does not require a license fee). BUT if you want to make them to sell, please remember that there is a one time $25 license fee in order for you to be able to do so. And give Leann credit as the designer, she rocks and the whole world should know it.

Okay, now that that's done, let's get to it!

Step 1

I chose to print my skellies on black cotton but you can certainly print on any color fabric you like. When I make plushies, I cut the fabric in one hunk and I always cut way more then I need (traumatic events of not enough fabric for seam allowances have ensued and it ain't a pretty thing). For the skellies, I cut a 14" wide x 10" high piece of black cotton.


* * * * * * * * * * * * * * * * * * * * * * * * * * * * * * * * * * * * * * * * *

Step 2

Screen the skelly in your paint color of choice.


I tried the neon paints on the black and they didn't work well. The colors that I used for the ones shown here and in my etsy shop were screened with the colors milk, envy, banana peel, strawberry shake, blue hawaii and fairytale.


* * * * * * * * * * * * * * * * * * * * * * * * * * * * * * * * * * * * * * * * *

Step 3

Heat set your skelly completely before moving on to the sewing stage. (I like to heat set on the opposite side of the fabric I print on.)


* * * * * * * * * * * * * * * * * * * * * * * * * * * * * * * * * * * * * * * * *

Step 4

Fold the fabric in half, right sides together, and pin to keep it from shifting during sewing.
If you can't see your print through the fabric, baste around it with a contrasting thread in large stitches so you know where to sew. Do this before you pin right sides together.


Drag your plushie over to your sewing machine and begin sewing around the edges of the printed design. I sewed about half an inch around the outline and just went with it, I didn't worry about making it perfect. When you look at the ones in the shop, you'll see that each one is different, a little quirky and totally individual.


* * * * * * * * * * * * * * * * * * * * * * * * * * * * * * * * * * * * * * * * *

Step 5

I usually sew my plushies completely shut and then cut a slit on the backside for turning and stuffing.


If you don't like that option, leave an opening in the seam during sewing to use to turn and stuff your skelly.

Trim away excess fabric and clip any curves to ease turning your skelly right side out:


* * * * * * * * * * * * * * * * * * * * * * * * * * * * * * * * * * * * * * * * *

Step 6

Stuff your skelly. You'll be shocked how much polyfill you can cram into this little plushie. Keep going until you're happy with the level of stuffiness. If you like firm solid plushies, stuff a lot. If you prefer squishy, don't use as much.


* * * * * * * * * * * * * * * * * * * * * * * * * * * * * * * * * * * * * * * * *

Step 7

Hand sew shut the turning/stuffing opening. I like to use a size 8 perle cotton. Feels sturdier to me.


You can clean up stray polyfill fibers with some scotch tape.

Since I cut open the back, I put my label over it to hide it.


And there you have it! A skelly ready to do your bidding!


And what exactly do skellies enjoy doing? Here are a few examples.

They try to blend in with other chachkis:


They enjoy traveling to parties in packs:


They like to be hugged:

That's Leann!


They enjoy sunbathing in public spaces:


They make bikers look tough:


Don't delay! Make yourself a gaggle today! Or swing on by the shop and pick one up to hang out with.